Fishing the dry fly is the epitome of fly fishing. Not only are you imitating nature’s own handiwork with feathers, fur, foam, and hair, but fishing the dry fly adds visual excitement to the thrills and challenges of luring fish with a fly. It may be true that 90 percent of the time a trout angler’s quarry feeds subsurface, but to witness a trout rising gingerly to take your offering off the water’s surface is one of the most beautiful experiences in our sport.
Surprisingly little is known about the history of fly fishing the water’s surface. Some believe the Egyptians were the first to experiment with an artificial floating fly. Hand-carved stone images found by archaeologists are clues that the early Egyptians, too, valued this practice. Egyptian anglers used hand-forged hooks of copper and a dressing of brilliantly dyed feathers to entice the native fish of the Nile River. Did the Egyptians really invent the dry fly?
In terms of the written historical record in English, James Ogden, a tackle dealer in Cheltenham, England, claimed in the 1840s to have been the first to use a dry fly. In 1886, Frederic M. Halford, a master fly angler from the English chalk streams, published his first book on the subject, Floating Flies and How to Dress Them, which included 90 illustrations of fly patterns in hand-colored engravings, along with tips about how to be more successful on the water. Halford published four more books in his lifetime, including Modern Development of the Dry Fly: The New Dry Fly Patterns, the Manipulation of Dressing Them and Practical Experiences of Their Use. He was far ahead of his time in theory and practice when it came to making surface presentations to wary trout, and his work is legendary to this day. Other great fly anglers and tyers, including Theodore Gordon and George M. LaBranche, followed in Halford’s footsteps, perfecting the conception and use of the dry fly in the United States, a process that is far from over. So in addition to offering a fascinating experience that heightens our senses, fishing the dry fly is rich with tradition.
But fishing the dry fly can be frustrating, even for the most accomplished angler. Feeding trout can ignore or reject your presentation in ways that seem to be personal affronts directed specifically at you and your angling skills. Whether you’re a dyed-in-the-wool dry-fly purist or just want to become a better dry-fly angler, there are things you can do to improve your game and avoid the indignity of the equivalent of a one-finger, bestowed by an organism with a brain the size of a pea. Mastering fly-first presentations will make you a more successful devotee of the dry fly. So will understanding rise forms and therefore presenting the right fly on the surface in the right way.
Fly First: Reach Casts and Bump Mends
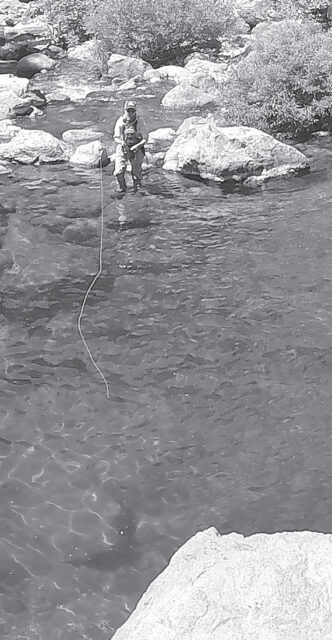
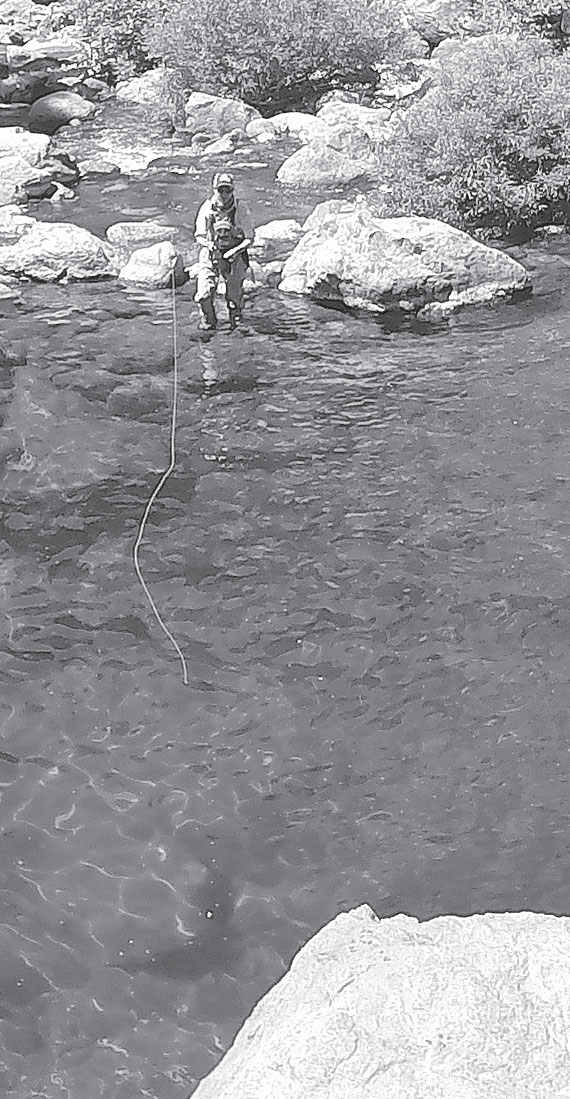
We all know that presentation is the key to fly fishing in general, and it is especially important when fishing the dry fly. In my experience, the best presentation is one that delivers your fly first into the trout’s cone of vision. It sees nothing except your fly and usually accepts the offering.
The most effective fly-first presentations are reach casts and what I call “bump mends.” These can seem to be very technical and a challenge to master because there are so many interconnected actions happening at once. To achieve proficiency with these downstream presentations, you will need to practice on the water under varying conditions. But the payoff in terms of fish caught makes the effort exceedingly worthwhile.
The reach cast is best executed from upstream and across from your target. Make a series of false casts aiming slightly downstream, toward the rising fish. This allows you to gauge the correct distance needed to reach the feeding lane. On the final forward cast, while the line is still in the air, move the tip of the rod upstream. This is in effect an aerial mend. The fly lands downstream, with the leader and fly line trailing upstream of it. Once the fly, leader, and line make contact with the water, bring the rod tip back downstream and begin feeding out and mending your line as necessary to have the fly reach and drift through your target water without drag. If the trout refuses your fly, after it has drifted past the fish you can pull the line off to the side to avoid spooking the fish when you pick the line up for another cast.
The angle, distance, and placement of the fly in you quarry’s feeding lane must be perfect. A trout that is rising with a rhythm while defending its lie will not move very far. I use the reach-cast presentation most of the time when fishing bigger water or when casting to the opposite bank when the fish are sheltered by streamside foliage and hard to reach with any other method.
When employing the reach cast across complex currents that have multiple seams, it’s often best to use a short drift, where the fly floats with a drag-free drift only 3 to 10 feet in length. Multiple seams and currents can make mending extremely difficult. Often, trying to mend in such conditions pulls your fly under the surface. A shorter drift, however, can minimize the effect these conflicting currents have on your line, creating the drag-free drift needed to produce a strike. On the lower Yuba River, there is a run called the Clay Banks, where I use short drifts in multiple spots against the cut bank. The river’s current flows with a high velocity as it meets the face of the banks, and the currents swirl in circles in the opposite direction on the rebound. The wild rainbows like to lie between the swirling water and the bank as they feed on emergers and duns during a hatch. Because the currents are so complex, the best approach is to use a reach cast with an aerial mend, landing the fly 3 feet upstream from the rising fish. The drift will be short, but the fly will have zero drag as it floats into the trout’s cone of vision. I prefer to use this method in such spots rather than trying to achieve a drag-free presentation of greater length.
The bump mend is my name for a tried-and-true presentation that is known by other names, such as stack mending and the Fall River twitch (because on the Fall River, this presentation is effective when used from an anchored pram and fishing to a pod of trout rising downstream). It might involve a reach cast as well, but usually such reaches are small, because your objective is to try and position yourself upstream and either directly above or slightly off to the side of the target fish. Consider the bump mend more as a way to feed line in a steady manner to achieve a drag-free drift, rather than as a way to place the fly, which is what a reach cast does. My longest successful take on the Fall while using this technique was at 70 feet downstream on a section we call the Leaning Cedar. For the wading angler, it is extremely effective, as well.
In this presentation, line is peeled off the reel and then flipped from the tip of the rod as the fly floats downstream, often up to and over a distance of 50 feet. The mechanics of the bump mend start with the reel higher than the tip of the rod, which is about a foot above the surface of the water. With the reel higher, gravity aids in dispensing the line from the tip as you whip the rod tip up and down in 2-foot increments — the bumps of the bump mend. When done correctly, you’ll actually see waves of line being released from the tip of the rod during the upward bumps. An angler can either have line already pulled from the reel or peel off line as the fly is moving downstream. In my experience, when fishing from a boat, on dry ground, or wading in water that is not rapidly moving, pulling the line off the reel before making the presentation is best because it allows you to focus solely on the flip. When wading in faster water, it is better to peel the line off the reel as the drift moves downstream because the heavy current will surely pull on any free line hanging below the rod, making the presentation more difficult.
A proper bump-mend presentation starts with by positioning yourself at least 30 feet or more directly upstream from the target, even while wading. Make a few false casts and lay the line downstream in a current lane that will deliver the fly, leader, and fly line to the target. Once the line hits the water, feed out line using “bumps” so it travels at the same speed as the current. There is a fine distinction between having too much slack and too little. Too much slack will result in a missed strike. Too little slack will create microdrag, and the trout will refuse the fly. When the trout takes the fly, set the hook with the rod at a 45-degree angle off to either side. Setting the hook in this way helps to make a solid connection, with the fly in the upper side or corner of the fish’s mouth.
Something also to consider with a downstream, fly-first, bump-mend presentation is how the trout inhales the fly. Sometimes a fish will take it very slowly, and you must wait until it closes its mouth before you set the hook. I’ve pulled the fly out of a few mouths in my time because I did not wait long enough. Even though it may be a matter of just a few seconds, this lag can make the difference between a solid hookup and a missed strike. Bigger trout tend to take more slowly, especially brown trout, while smaller trout seem to react much more quickly.
Having the right leader when fishing downstream can be a critical factor in drawing a hit. When fishing slow streams such as spring creeks, a long, light leader has flexibility that can reduce drag and also keeps the highly visible fly line well back from the fly and the target fish.
Rise Forms
When trout are taking naturals on the surface, understanding rise forms gives you insight into what stage of the aquatic insect’s emergence has the attention of the fish and thus insight into what fly to use and how to present it. Knowing when to tie on an emerger, an upwinged adult, or a spent spinner is everything. Eliminating the guesswork enables you to maximize your effectiveness.
Before any rise takes place, a trout will inspect the food item to make sure it is worthy of consumption. During a dependable hatch, when the trout are most certain of the type of food floating downstream, they tend to rise confidently and consistently, sometimes aggressively, with very little hesitation. If they doubt the edibility of an object in the drift, however, the fish may drift downstream under the insect, taking longer to inspect it. And if the fish really doubts the nature of the object drifting overhead, it will drift downstream or across the stream beneath it, giving it a thorough inspection. If the object is your fly and has even the slightest amount of drag, the trout will refuse the offering and return to its holding area. In addition to this, in slower water, fish have more time to inspect what they might eat. In faster water, however, the trout has only a second or so to make up its mind and usually acts on impulse with an aggressive take, much to the advantage of the fly angler.

Once a trout commits to eating something that appears on the surface, how it proceeds to do so depends on what the item is (your fly, as well as the naturals you’re trying to imitate), where it is, and how it behaves.
The simplest rise form — I simply call it the “simple rise” — is the one that most fly anglers understand and recognize easily. The trout holds at a comfortable spot where it can observe the water in front of it. The food item drifts overhead and downstream. The trout notices there may be an opportunity to eat and takes an interest. Inspection of the food item commences, and the trout does not hesitate. It consumes what’s on the surface, creating an obvious, moderately-sized rise ring, and returns to its comfortable spot.
By contrast, the rise form known as “kissing the sky” appears only as be a dimple with a very small ring left behind. In this case the food item is immobile, and the trout does not have to worry about it flying away off the surface. Midge emergers, midge adults, and at times spent mayflies are often what the

fish are eating when rising in this way. If there is no wind, the trout can take its time during the inspection of the aquatic insect. With such soft rise forms, many fly anglers think that the fish that make them must be small, when in reality it is often a much larger trout. Although the rings they make are small, during periods of heavy hatch activity on fertile still waters, they can be visible from a long distance off.
A “sipping” rise form occurs when a trout’s nose pokes above the surface, usually taking medium to small upwinged adult insects that are immobile in the surface film. As the trout ingests the food item, it gulps in some air, which is released through the gill plates and forms a bubble on the surface as the trout dips back down underwater. The bubble is a clue for the observant angler. Sipping can be a common occurrence in back eddies, where food items collect, and in areas of softer water.
“The suck” is one rise form that most fly anglers miss completely, mainly due to the fact that it is, at times, invisible. “The suck” rise form happens when a trout draws in the water around the food item from underneath. The bigger the fish, the more suction power available to take the food item from the surface, and many times it will not even leave a trace in doing so. On the Madison River in Montana in 1998, I was testing a three-layer foam grasshopper pattern I had developed, making bump-mend drifts downstream next to an undercut bank. Twice my hopper pattern disappeared, which I thought was odd, because it was highly buoyant. The third time it disappeared, I set the hook and was rewarded with a 22-inch brown trout. The next time your dry fly disappears for any reason, set the hook. “The slash” rise form is usually heard before it is seen, and if observed, you will have no problem making the identification. “The slash” occurs when emerging insects — typically caddis pupae — are quickly ascending through the water column. Explosive takes occur as the trout chase the food item to the surface, and the water is disturbed with the spray and splashing that results, even if the trout caught the emerger below the surface. Slashing rises also can occur when trout feed on small fish near the surface. This is a common occurrence on the lower Yuba River when the salmon fry have hatched and the trout key on them during the winter.
The next four rise forms are complicated, and because the feeding behavior can be classified as subsurface or in the surface film, they do not always warrant a true dry fly. “Bulging” is the most difficult to identify, because there is no ring or disturbance on the surface. Anglers who spend a lot of time on the water will recognize that what they are seeing looks unnatural when a bulge of water forms in a run. A trout will suspend itself about a foot below the surface while feeding on emerging nymphs. Its back pushes water toward the surface as it rises to feed, and a hump appears intermittently on the water as a result.
There are two different types of “tailing” rise forms, and each reveals the fact that a different food item is being captured. The first appears as the tip of the fish’s tail sticking out of the water behind a small wedge formed on the water’s surface by the shoulders and head of the trout just beneath it. The trout is moving upstream a few feet, then drifting back to its subsurface observation post. It is feeding on spent-wing mayflies, midges, and stillborn aquatic insects trapped in the meniscus. The second type of tailing occurs when trout are feeding on the bottom of a river or in stillwater shallows. Rooting along the bottom, the trout dislodges and eats snails, crayfish, and aquatic insects. Its body position is near vertical, and the tail extends from the water’s surface, often flopping back and forth.
Like the bulging rise form, “porpoising” is also caused by a trout that is just under the surface, actively feeding on emerging mayfly nymphs. The difference is that the trout pushes up higher in the water column and breaks the surface water with its back for a split second. As it quickly goes under, there is a very small splash caused by the movement. Whether the trout are bulging, tailing, or porpoising, an effective tactic is to use a dry/dropper rig with a small nymph or a drowned flat wing spinner pattern trailing behind a larger dry fly.
The “head-and-tail” rise form is one of the most fascinating to watch, it is elegant and reveals the trout’s entire body. As aquatic insects drift downstream stuck in the meniscus, the trout’s head appears first and consumes the food item. The fish then dives back down, exposing its body and then its tail. Finally, sometimes a bubble will appear if the trout has ingested air. Understanding rise forms will help you fish the appropriate fly in the most effective way. Especially for selective or heavily pressured fish, the most effective way is often a fly-first downstream presentation. Even if you aren’t a dry-fly fanatic, you will enjoy success if you master these presentation techniques and apply what you learn by observing how trout rise to feed on insects on the surface.
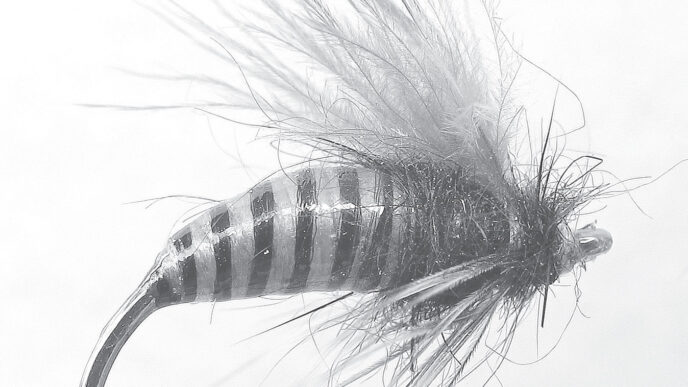
Jon Baiocchi’s Go-To Dry Flies
Traveling the western United States in my younger days gave me the opportunity to visit rivers and lakes where the fishing was very technical and that offered legendary hatches that I still dream about to this day. The flies that I fished then have withstood the test of time and are staples in my dry-fly box when I fish waters from the Sierra to the floor of the Central Valley and beyond.

Craig Matthews’s Sparkle Dun is incredibly simple to tie. It’s just a tail of Z-Lon that represents a trailing shuck, a dubbed or quill body, and fine deer hair that is tied in a splaying fan, Comparadun style. You can match any species of mayfly you desire, just adjust the size and the color of the shuck, body, and wing.

The Parachute Midge Emerger was developed by Scot Sanchez to fool the pickiest of trout on the South Fork of the Snake River. I use this pattern more often on still waters than on rivers because of the way it sits in the film. The body is dubbed with a slight taper and ribbed with pearl Krystal Flash. A full hackle toward the head with some poly yarn that sticks up and forward at a 45-degree angle complete the fly. You treat only the hackle and wing with floatant, and the body sits below the surface nearly vertical, matching an emerging midge perfectly. I tie it in sizes 16 to 22, in colors of black, gray, cream, and light green.

Bob Quigley’s contributions to fly fishing and fly tying increased our understanding of many hatches and our success in fishing them. The venue for his studies was the Fall River. The Hackle Stacker is an emerger pattern with a shuck of Z-Lon, dubbed body, and an unusual way of placing the hackle, which is wrapped onto a piece of thin monofilament, then pulled over the thorax and tied off.

The Film Critic is another Quigley creation. It is tied just like the Hackle Stacker except for an emerger wing tilted forward at a 45-degree angle. The wing can be made of Z-Lon, poly, or deer hair and provides a trigger that catches selective fish. Both of Bob’s patterns can be adjusted to any species of mayfly (image is a drake).

The E/C Caddis is a creation by masterminds Ralph and Lisa Cutter, who have an extensive knowledge of aquatic insects and trout behavior. It, too, is relatively easy to tie. Its two-tone body and ability to sit flush in the surface film makes this fly a true winner. Just before and during a caddis emergence is when this fly shines best. As with some of the other guide flies listed here, size and color may be adjusted to imitate any caddis hatch at any given time.

The Stimulator is part attractor and part imitation. The profile suggests adult stoneflies, while fishing it in colors such as yellow, orange, and red may simply just attract a strike. This fly has been around a long time and was created in the vise of Jim Slattery, later modified by Randall Kaufmann. The Stimulator consists of a short tail of deer hair with a dubbed body that is hackled palmer style and a large overwing of deer hair topped with pearl Krystal flash. This makes a great top fly for a dry/dropper rig because of its buoyancy.

The Skwala Unit is a unique fly from a guide on the Bitterroot River. John Cook came up with the idea of an extended body of foam, a bullet-style head and wing from deer hair, and the addition of rubber legs to provide movement. This is my go-to fly for the Skwala hatch on the lower Yuba River, the Truckee, and the East Walker. The design is simple, yet the end result produces confident takes from educated trout. The trout are certain it is the real insect as it drifts downstream, while the legs imitate the twitchy movements of the Skwala stonefly.

There are so many foam grasshopper patterns today that it is hard to keep up. It seems as if every year new ones hit the fly shop bins. The Club Sandwich Hopper was the original foam pattern that I began to tie and fish in the late 1990s. The fly is so effective because it floats like a cork, yet sits flush in the water’s surface, and the smooth look of foam makes it lifelike. Once again, the movement from the addition of rubber legs ties all of the ingredients together for a durable hopper pattern that seems alive. You don’t argue with results, especially when it’s 21 fish over 18 inches in a single session on the Madison River.
Finally, Lee Wulff’s Royal Wulff is my favorite old-school attractor. (Not pictured here because it is a very common pattern.) It has a bushy, high-floating profile, and its red, white, and peacock herl colors induce strikes in both fast water and slow-moving currents. It can even be effective on challenging waters such as the Little Truckee River, and that says a lot.
You can find tying instructions for most of these flies on-line.
— Jon Baiocchi