

I was introduced to Mike Rieser by the late Pete Parker at the Sacramento International Sportsmen’s Exposition show a number of years ago. Pete, who ran the fly-tying theater for the ISE shows, wanted to know whether there was room for Mike and his companion, Merry Waugh, to set up a tying station at the flytying How-To Center that I, under Pete’s tutelage, have run at the Sacramento show for the last 12 or so years. Long story short: I made room. Mike and Merry were an instant hit with the audience with their innovative patterns and techniques and their friendly and informative approach.
The fly-fishing bug bit Mike some 45 years ago at the impressionable age of 10. A keen interest in fly tying quickly followed, punctuated with raids on his mother’s sewing kit and on reluctant barnyard critters for their feathers and fur.
A driver’s license and a car in 1967 carried Mike’s fly-fishing passion from his local waters of Santa Ynez, California, to the Pacific Ocean in pursuit of bonitos, calico bass, stripers, and blue sharks.
In 1973, Mike made his first trip down the Baja Peninsula, where he would spend the next 15 winters camping on the beaches and fishing flies on this new flyfishing frontier. He spent a great deal of time camping and fishing with the handline fishermen (pangeros) who, despite their skepticism about fishing the wimpy rod, shared their knowledge of the Sea of Cortez and its great variety of fish. Through a process of trial and error, Mike developed his methods for catching many species, including the elusive roosterfish, once deemed impossible to catch on a fly. This extensive foundation of knowledge and experience eventually led to the founding, by Mike, of the Baja Flyfishing Company in 1997.
Besides guiding in Baja, Mike has worked as a fly-fishing guide since 1974 in the Sierra Nevada and the Rocky Mountains. He ties flies commercially and has served as a saltwater fly-fishing adviser for the Fly Fishing Destinations television show. The Baja Flyfishing Company has been featured on film by Warren Miller Productions, The Ron and Raven Show, Fly Fishing across America, Hawg Quest, Anglers West, and Michael Fawlk’s Productions. Mike recently completed a book on fly fishing the Sea of Cortez with application to the common game species found throughout the tropical Pacific: Fly Fishing the Baja and Beyond: A Guide’s Perspective to Catching Roosterfish and Other Tropical Species. Interested readers can go to www.lulu.com and enter the title in the search box for more information.
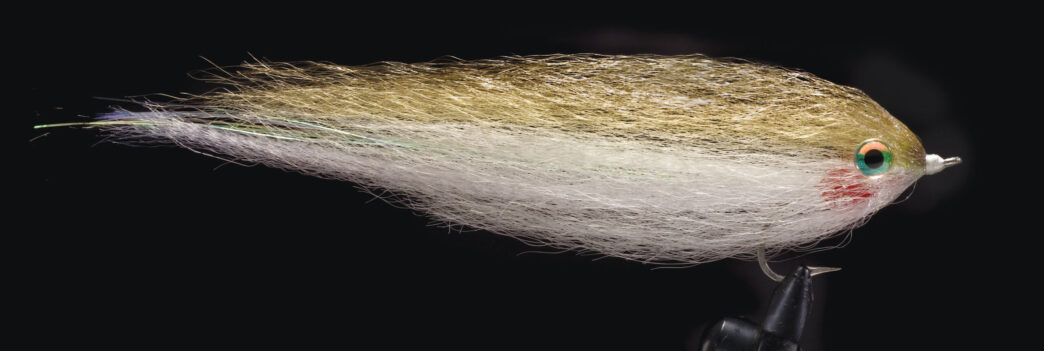
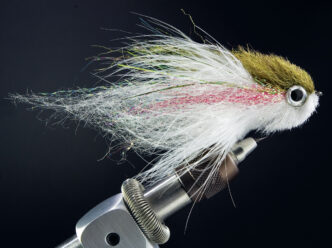
The Gym Sock began its life on the beaches of Baja California as a mullet pattern fished for Goliath-sized roosterfish. According to Mike, the fly went unnamed for several seasons. Then one day a client complained about throwing the bulky pattern, comparing it to casting a wet gym sock. Seizing the humor of the moment, Mike named the pattern on the spot.
The Gym Sock has become a staple fly in the Sea of Cortez. It has been tied in a wide variety of color combinations to imitate mullet, ladyfish, caballitos, mackerel, and large ballyhoos (Hemiramphus brasiliensis). Large pink-and-white Gym Socks tied on tandem hooks have become a favorite billfish pattern, along with other brightly colored variations.
The Gym Sock is versatile, capable of adapting to any situation that calls for a large-profile baitfish fly with enhanced movement in the water. The pattern is designed for movement, with its hollow body, fluttering, flashy tail, and a head that pushes water.
California Delta striper anglers have found a rainbow-colored variation to be deadly when stripers are feeding on juvenile steelhead. Largemouth bass fly fishers in Southern California use the rainbow version to imitate stocked rainbow trout — a Florida-strain bass Happy Meal. A fire tiger color scheme has proven effective when targeting a wide range of large predatory fish, including pike, muskies, lake trout, king salmon, and peacock bass. In the waters of the pattern’s origin, the fly has caught roosterfish, jack crevalles, dorados, striped marlin, sailfish, wahoos, pargos, African pampanos, yellowfin tuna, and a host of other species.
The Gym Sock evolved toward a sleeker profile by dressing the fly more sparsely. The original version was based on a fly pattern known as the Rasta, which featured a fox-fur head. Simply tying in a wing of Super Hair over the Rasta’s fur head and applying a T-shirt glue/paint called Scribbles in a clear glitter color to smooth down the head and hold the wing material in place produced a fly with a more lifelike shape and motion. Scribbles is available in craft stores, comes in a range of colors, remains flexible, does not yellow, is water based and easy to work with, and at about $1.25 per bottle is inexpensive.
Mike’s design concept was to create a body with a hollow look and shape that would enhance the movement of the wing material, an essential element in a roosterfish fly. The wing dressing was tied fairly full at first in order to cover the fox-fur underhead. In time, he began to use lamb’s wool as the underhead material, and with each batch, he clipped the wool head shorter to reduce the bulk of the wing. Egg yarn eventually replaced the lamb’s wool, providing some excellent color effects under the Super Hair wing and most importantly creating a tighter and smoother ball that spreads the wing material.
The current version of the Gym Sock is a much easier fly to throw, thanks to the sparse wing design and materials used, which don’t absorb water. Synthetic wig hair can be an excellent substitute for Super Hair, being finer and more supple. So can yak hair or Ultra Hair. (In other words, experiment.) Baja guide Merry Waugh, Mike’s associate, has developed a very sparse variation using the Steve Farrar Blend of hair and fine flash materials. The Gym Sock has become their hallmark fly.
Gym Sock Materials
Hook: 3/0 to 6/0 saltwater hook of choice (the overall length of the fly will be six to eight inches)
Thread: White 210 denier
Tail: White Super Hair.
Flash: Pearl Flashabou extending three-quarters of an inch beyond the tail material, with the tip marked black with a permanent marker
Gills: Red Crystal Chenille
Underhead: Lamb’s wool or egg yarn
Belly: White Super Hair
Side: White or tan Super Hair
Top: Gray or tan Super Hair
Head: Hair glued in place with clear crystal Scribbles glue
Eyes: 3D Super Pearl holographic stickon eyes, sizes 5/16 inch to 1/2 inch
Tying instructions
Step 1: Tie on the thread at the hook bend. Cut a bundle of Super Hair one-eighth of an inch in diameter for the tail, grasp it in the middle of the bunch, and roll it between your fingers. This will create a taper to the bundle of fibers at each end of the bunch. As it comes from the package, Super Hair, is about ten and a half inches in length. At the hook bend, tie the Super Hair in at the midpoint of the bunch so that the tail extends approximately five inches beyond the hook bend. Do not trim the remaining Super Hair. It will be used in the next step.
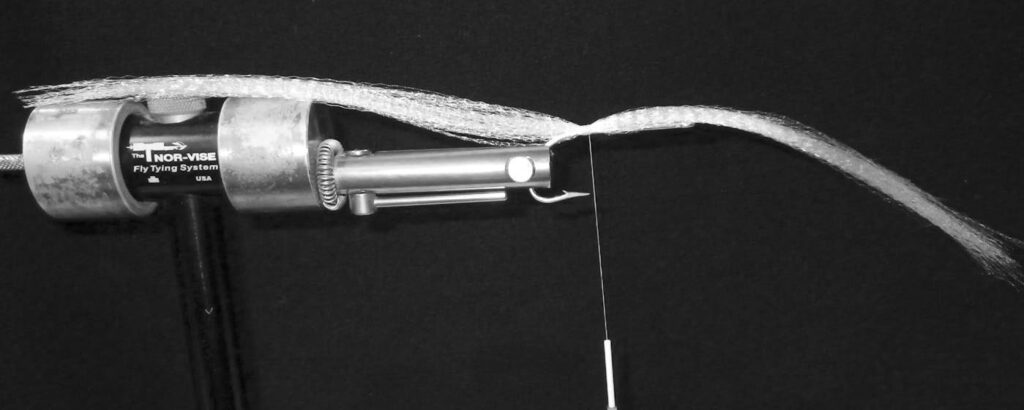
Step 2: Tie in 12 strands of pearl Flashabou at the same point, directly on top of the Super Hair, the tips extending at least three-quarters of an inch beyond the Super Hair. Trim the Flashabou butts. Fold the remaining Super Hair back over the flash and secure it with a number of tight thread wraps. If you’d like, mark the Flashabou tips with a black permanent marker to help define the tail.
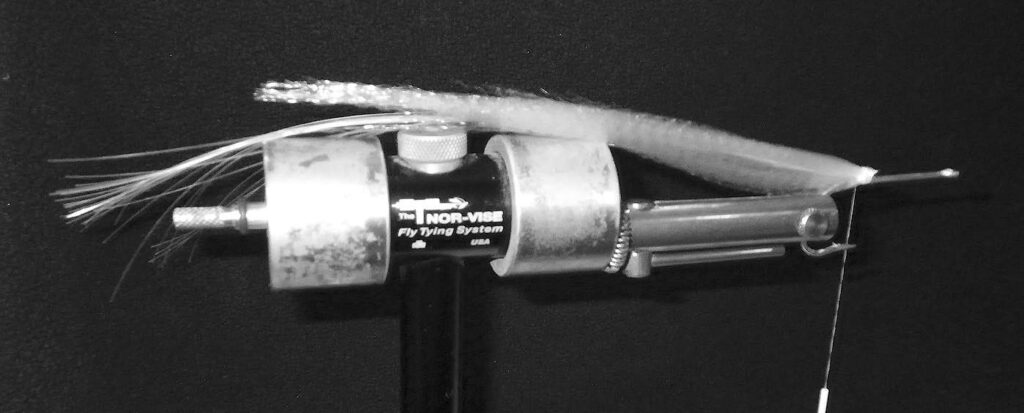
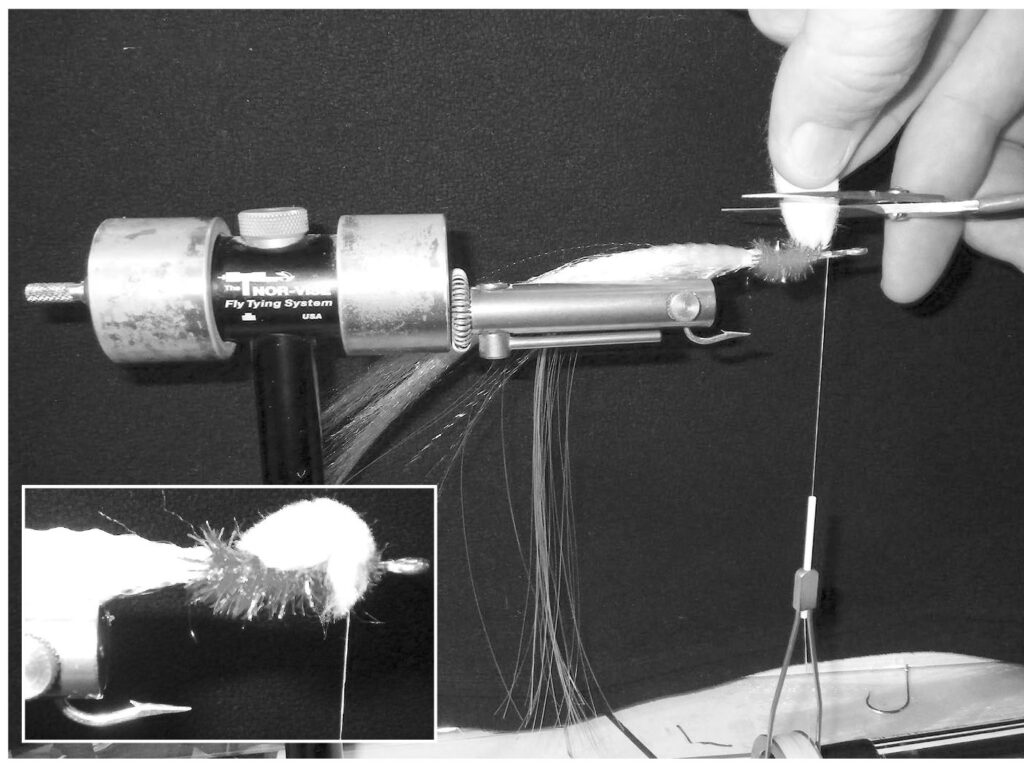
Step 3: Just ahead of the tail, tie in a piece of red Crystal Chenille and wrap it forward a few times.
Step 4: Advance the thread to a point three-eighths of an inch behind the hook eye. At that point, tie in a one-inch-long bundle of egg yarn three-quarters of an inch in diameter on the top side of the hook using two loose wraps at the midpoint of the bundle. Egg yarn comes in many colors and may be used as a contrasting color under the hair to achieve different effects. While holding both ends of the yarn up to keep the material on the top of the hook, pull downward tightly on the thread to flair the yarn as you would for an egg pattern. Pull up on both ends of the bundle and clip with sharp scissors. The result should resemble half of an egg pattern directly on top of the hook.
Step 5: Rotate the fly so that the bottom of the hook is facing upward. Begin forming the underbelly of the fly’s body by cutting a pencil-sized bundle of white Super Hair and rolling it as in Step 1. Tie it in at the front of the egg-yarn head at the midpoint of the bundle and spread the strands around the bottom half of the head. Leave the forward-facing strands of Super Hair in place for now.
Step 6: Rotate the fly so that the top of the hook is again facing upward. Cut and taper a pencil-sized bundle of tan Super Hair. Tie this bunch in on the side of the hook at the front of the egg yarn head and repeat on the other side to form the sides of the fly. Again, leave the forward-facing strands in place.
Step 7: Form the top of the fly by cutting and tying in a pencil-sized bundle of gray Super Hair on the top of the hook, at the front of the egg-yarn head, using the same techniques. Leave the thread at the front of the fly.
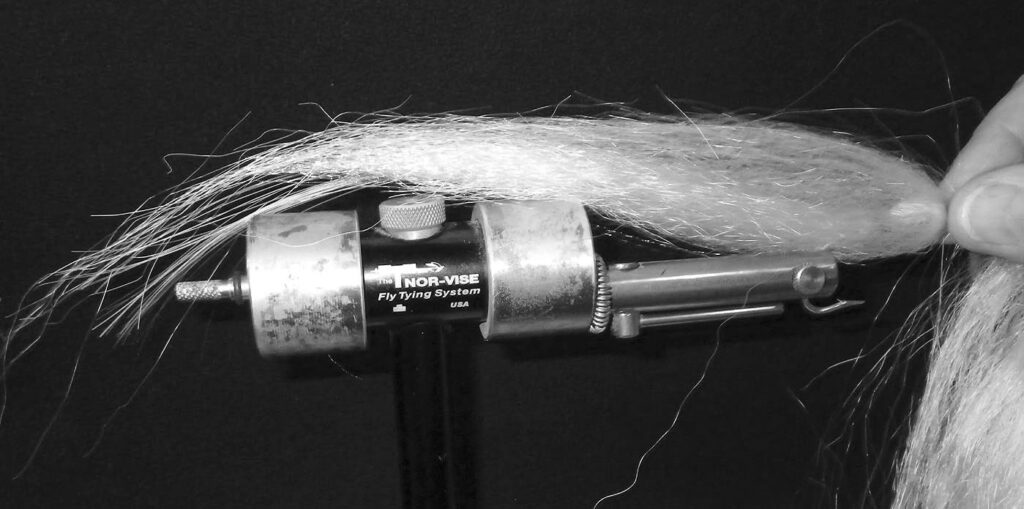
Step 8: Smooth all of the strands of Super Hair, making sure that each color is in its place and evenly distributed around the egg-yarn head. Pull the forward-facing fibers back over the head and tie them down in front of the egg-yarn head securely so that they face rearward. The fly should have a decidedly sparse, hollow-appearing body that allows for lots of movement of the tail and wing material. Ensure that the respective colors of the strands are located in their proper place and are evenly distributed. Make any needed adjustments to accomplish this and finish the fly by wrapping a small, tapered head.
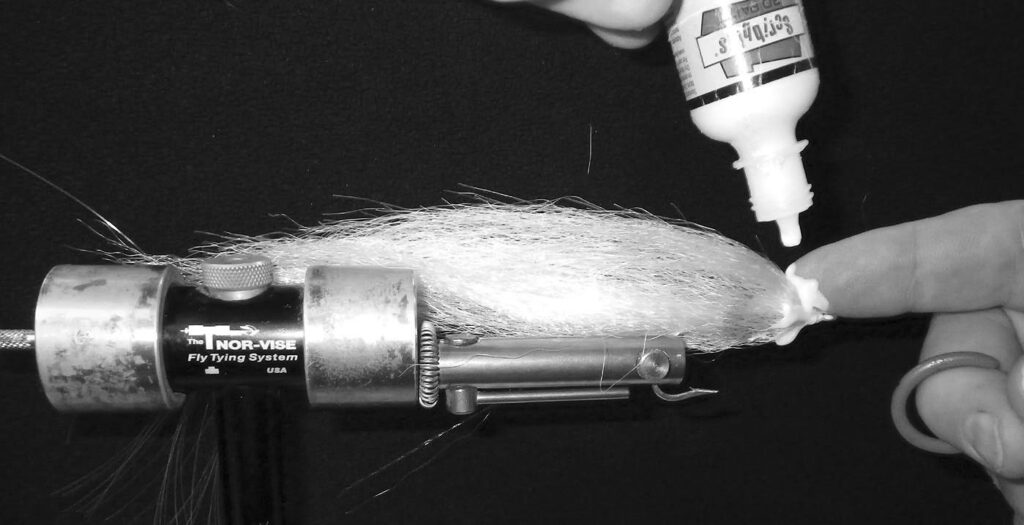
Step 9: Squeeze a generous amount of clear crystal Scribbles glue onto the thread head and the Super Hair covering the egg yarn. With your fingers, work the Scribbles glue into the Super Hair and yarn, taking care not to get Scribbles onto the Super Hair behind the head. Hang the fly with the head up until the Scribbles glue dries. This helps to ensure the proper shape to the fly when cured.
Step 10: Once the head has cured, apply the 3D holographic eyes to the sides of the head using Goop cement. If you’d like a little extra pizazz, you can use a black permanent marker to add barring to the top of the fly.


")