

I met John Ryzanych many years ago at a fishing show, where I occupied the fly-tying seat adjacent to him. As we sat tying flies, trading fishing tales, and talking “tyerspeak,” I became intrigued by John’s imaginative use of common and new materials and his creative design concepts. In the intervening years, John has become a leading designer of fly patterns for both fresh and saltwater applications. His patterns include the Fat Head baitfish, the Soft Crab and Soft Shrimp, the Silver Belly Baitfish, the Two-Tone Stonefly that is the subject of this column, and John’s Air Head top-water fly. (Other patterns bear the “Air Head” name, notably one designed by Charlie Bisharat.)
While John appears regularly at fishing show tying tables, readers have undoubtedly visited his booth at those same shows where he sells shirts bearing the Catch and Release, Zero Limit logo. He also markets a clear, flexible coating material used by fly tyers, braided loops with fly-line identification labels, and a convenient tying tool. John is an active conservation advocate, most recently fulfilling terms on the Bay Delta Sport Fishing Enhancement Stamp Committee and the Board of Directors of the Northern California Council of the Federation of Fly Fishers. He has also authored magazine articles for California Fly Fisher, Saltwater Fly Fishing, and Fly Fishing in Salt Waters. As time allows, John pursues his passion for saltwater angling.
Here’s John’s description of his unique process for creating a durable, dual-tone, realistic nymph.
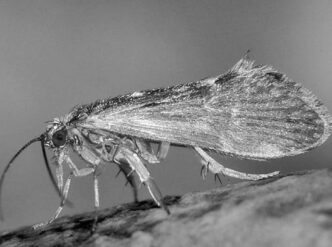
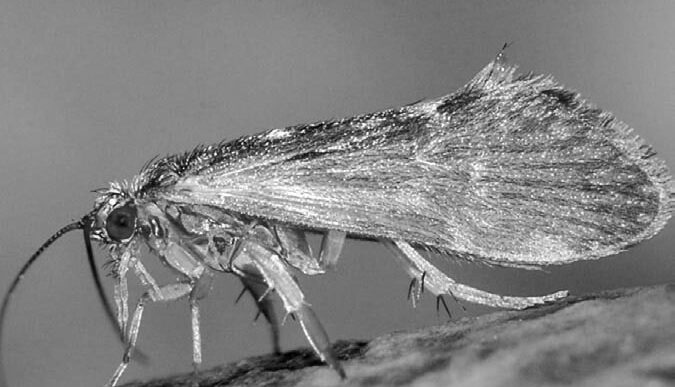
“Since first poking a finger into the bottom of a seine net, I have been captivated by how to mimic the diverse aquatic insects captured there. Many of the mayfly, salmon fly, and stonefly nymphs have a mottled coloration closely matching their rocky environment, while others sport less dramatic monochromatic tones. The one common trait among them is an underside that is lighter in color than their dorsal surface. Few traditional fly patterns have addressed this two-tone body color, and those that have require learning new tying techniques, plus trips to the fly shop for more materials. Not wanting to add to my materials investment, I found I could use my existing materials to emulate the two-tone coloration by using a clear, flexible coating such as Softex to create the darker tone of the carapace, the top side of the fly. Let me explain how I struggled with various iterations and finally arrived at the solution set out below.
“Over time, my interest in dry flies caused my assortment of hackle necks and capes to expand far beyond the basic, common grizzly and natural brown colors. Like most dedicated tyers, every junket to a local or destination fly shop resulted in a purchase — sometimes it was a simple spool of thread or small packet of obscure fur, but often the trove could be weighed in pounds and challenged the checkbook balance. While my growing assortment of variants, furnaces, and dyed grizzlies soon filled a separate box, what often captivated me were skins of birds harvested locally and those little hen and rooster capes from India and China. While not of sufficient quality to float a dry fly, the imports possess the unique natural mottling and light speckling characteristic of the dorsal side of nymphs found in freestone streams such as the upper Sacramento and Trinity Rivers. “My seemingly endless efforts to use these interesting feathers to create a durable dark dorsal surface or carapace on a nymph pattern were thwarted by their tendency to spread apart, break while being tied to a hook, or shred into little spikes after only one fish — leaving me with a supply of skins with bald spots where the size 12, 14, and 16 feathers had been plucked, but with an unsolved problem.
“Turning to the fly-tying literature for help, I found a wealth of general tying information on classic techniques and the proper order of securing traditional materials to a hook, but precious little information addressing my concerns about how to build in durability when imitating the color and markings of nymph carapaces. For example, turkey wings and grizzly necks are traditional materials often specified for the dorsal side of nymphs. While they have some natural mottling and segmentation, their color is often inaccurate, and feathers tend to unmarry or lie unevenly over the back of a nymph when ribbed with thread or wire.
“My search for tougher, more accurate products led me to experiment with various solid films, sections of cloth and lace, and pieces cut from plastic bags and nylon stockings. A few commercial bug skins and wing cases became available, but their generic colors and mechanical design did not compete with the natural art of real feathers. I also tried weaving and crocheting threads and floss to form a two-tone body, but this time-intensive process required learning a new skill with new tools, and glue was needed to hold everything together and keep fish teeth from turning the fly into a fuzzball.
“My efforts at trying to use traditional materials in new applications having proven to be as frustrating as experimenting with new materials in traditional roles, I concluded that a new process would be needed to utilize hackles and delicate feathers to create a durable, accurately marked and colored nymph dorsal surface. “The answer to my two-tone dilemma came while reading an article on tying scuds. The author used a slice of thin poly film to create a semi-transparent shell, or carapace, over the back of his flies. I realized I could use a clear, flexible coating in combination with feathers to create a similar effect. Feathers that closely resemble the color and markings of aquatic insects could be coated and allowed to dry into a thin plastic film that looks like the skin of a real bug. The tip of a coated feather could easily be tied in at the back of the hook, along with the tail and ribbing material, to be used on the dorsal (top) side of the fly. The ventral (bottom) side could be dubbed with an appropriate color and texture in classic style. The treated feather (or “body skin”) could then be pulled over the dubbed body and held in place with turns of ribbing and thread to form a segmented abdomen, single or multiple wing cases, and a head. Thus, with durability assured by the coating, the only remaining variable would be feather selection to match the dorsal color and markings of the specific aquatic insect to be mimicked by the fly.
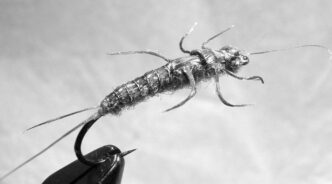
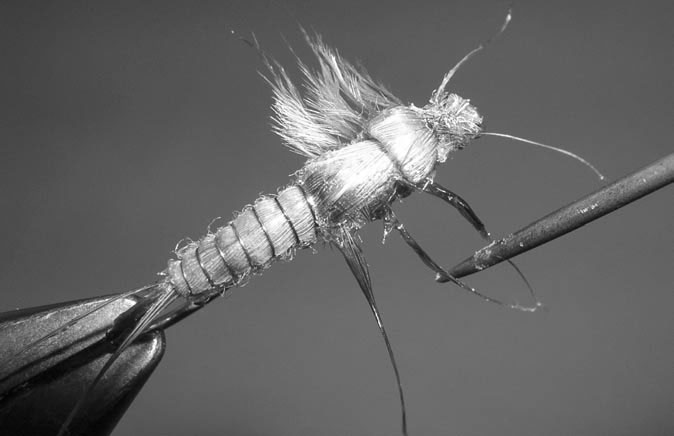
“I call my solution the ‘Two-Tone Stone,’ because it represents a style or technique of tying, rather than a specific insect. With a little experimentation and refining, the process has produced consistent results for realistic nymphs of all types and has proven to be a practical and effective method of converting feathers and fibers with little or limited use into new materials with expanded applications. Saltwater tyers now use flexible coatings on feathers to produce the segmented carapace of common shrimp. Bass aficionados tie patterns using treated brown, olive, and orange-dyed grizzly hackles to create realistic crayfish bodies and claws. Still, to me, the most artful and accurate application of this process is producing a consistent dorsal color over the entire abdomen, thorax, and head of a trout fly.”
Materials
Hook: 2X-long curved shank hook, such as Daiichi 1260, sizes 6 to 10
Thread: Size 8/0 in a color to match the body color
Weight: .030-inch lead wire or substitute
Coating material: Clear, flexible liquid, such as Softex
Tail: Neck hackle barbules to match the hackle used for the “body skin”
Ribbing: Fine copper or gold wire
Abdomen: Dubbing in a color to match the insect being imitated
Wing case: A “body skin” made as per the sidebar instructions
Legs: The untreated portion of the body skin feather
Thorax: Same as abdomen
Tying Instructions
Building a Two-Tone Stone Fly entails using certain standard tying procedures, such as dubbing a tapered body. Beyond that, the two-tone technique departs from traditional applications in that it uses a single treated feather to form the tail, legs, and a skin over the entire top of the fly’s body, thereby producing a consistent color pattern for all essential parts of the fly.
For our example, we’ll use a treated feather to create those three basic body parts of an aquatic insect (tail, legs, and carapace), but with a little practice and imagination, tyers can use the two-tone technique to produce segmented bodies, multiple wing cases, and other enhanced body parts. The process of treating feathers with a clear, flexible coating is detailed in the sidebar.
There are only three items that are unique to this pattern. The first is a drying surface. Any clean, dry, flat piece of smooth, glazed, nonvitreous material will do the job. The second is hackle — any domestic or imported neck hackle exhibiting the color and markings of the aquatic insect you are interested in reproducing. Select hackle size as you would for a dry fly, but move one size up for standard nymphs and two sizes up for wider flies. Finally, you need a clear, flexible bodyforming liquid such as Softex. All other materials and tools necessary to tie a nymph should be part of a basic tying kit.
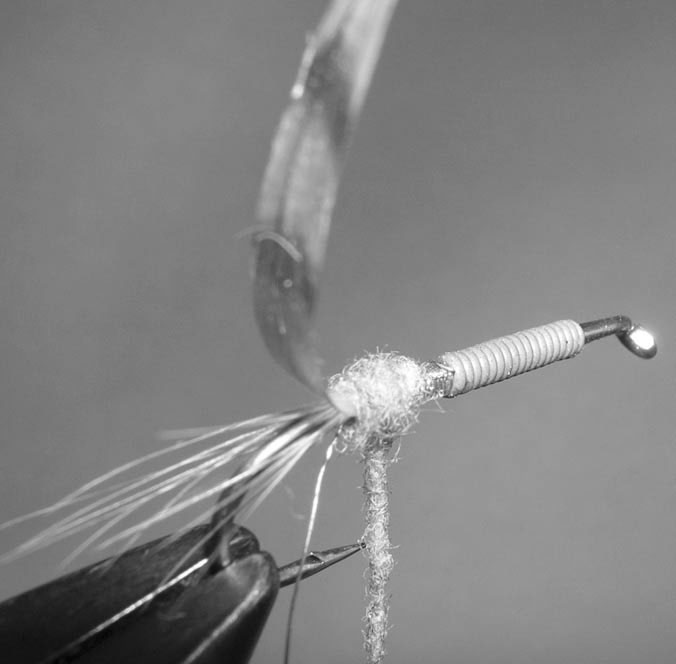
Step 1: Smash the barb and place the hook in the vise. Add weight consisting of four to five wraps of .030-inch lead wire or its substitute in the thorax area, leaving plenty of room between the eye and the weight. Coat the weight with a drop of flexible coating to anchor it, then allow it to dry. Doing so will prevent the thread from sliding between the thread wraps.
Step 2: Tie in the thread between the weight and the hook eye and continue wrapping back, covering the weight and hook shank.
Step 3: Select a hackle that has been turned into a body skin as per the sidebar instructions. Remove four to eight barbs from another feather of the same or different color and tie them in as a split tail.
Step 4: Tie in a section of wire at the same point as the tail. This will be used as ribbing.
Step 5: Tie in a body skin by its tip, again at the same point as the tail. Be sure to tie it in with the dull side facing up, because it will be drawn over the body to expose the shiny, marked side.
Step 6: Select an appropriate dubbing material a shade or two lighter than the treated feather to match the specific insect you are mimicking. Create a tapered dubbed body up to the rear of the weight and leave the thread at that point.
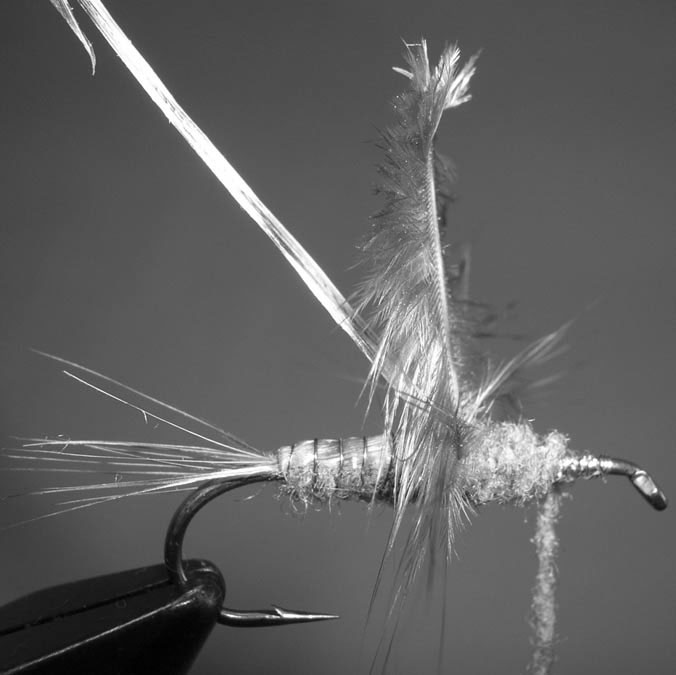
Step 7: Grasp the body skin and pull it over the dubbed body. Wrap it down with the ribbing wire tightly enough to create a segmented look. Stop the wire at the rear of the weight, secure the wire with thread, and cut away the excess. The remaining body skin should now be perpendicular to the hook, that is, tilted upward.
Step 8: Cut the untreated upper one-fourth of the body skin away. This thick section of the quill, with the loose, untreated, downy barbs will form the nymph legs. Tie this quill in where the weight meets the dubbed abdomen, with the barbs pointing to the rear of the fly.
Step 9: Pull the quill upward and dub a robust thorax extending one to two wraps in front of the weight. Pull the quill section over this thorax and tie it down in front. This will help to seat the barbule legs. Trim the excess quill and leave the thread at the tie-off spot.
Step 10: Pull the body skin over the thorax and tie it down at the same spot. Continue wrapping over the body skin to the hook eye and leave the thread there. The body skin should now be pointing out over the hook eye.
Step 11: Dub a head equal to or slightly larger than the thorax by dubbing backward to the thorax. Tie off the thread at this point and cut it so that about a foot of thread remains hanging from the fly between the head and thorax.
Step 12: Pull the remaining piece of the body skin back over the dubbed head section. Folding it over a bodkin can help shape this into a clean forehead edge. Place two overhand loops of thread over the body skin in a Clove Hitch manner to secure it to the fly. Trim the body skin over the thorax so it resembles a wing case.
Step 13: Add a drop of flexible coating to the abdomen, thorax, and head segments so it covers the skin and ribbing wire. Use a bodkin to apply the coating to the untreated, downey barbs, shaping them into individual legs and antennae. When dry, the two-tone pattern is ready to fish.
Body Skins
While the transition from feather to “body skin” may seem like a simple process, there is more to it than dunking a feather into glue and letting it dry. An uneven coating causes coating build-up on the feather, resulting in a lumpy fly body. Uneven drying could cause the feather barbs to bunch into a thin strip along the quill or twist into the shape of a corkscrew. The way to avoid such mishaps and produce consistent body skins is to use a simple drying surface. Any clean, dry, flat piece of smooth, glazed, nonvitreous material such as a tile square, dinner plate, or section of glass will work just fine. Or use one of John’s favorites — a beer or wine bottle. These ultra-smooth surfaces allow the coated feather to dry flat and straight, with even and parallel barbs, and to be easily lifted off the surface when the drying process is complete.
Immerse a neck hackle, tip first, about three-quarters of the way into clear, flexible coating liquid for a few seconds to assure that the immersed part of the feather is completely coated. If necessary, use your bodkin tip to push the feather through the fluid’s surface.
Slowly drag the feather out over the lip of the jar to scrape off any excess coating material. If you desire a lighter coating, the feather can be turned over to scrape more material off the other side or lightly squeezed between the jar lip and bodkin in a single pass.
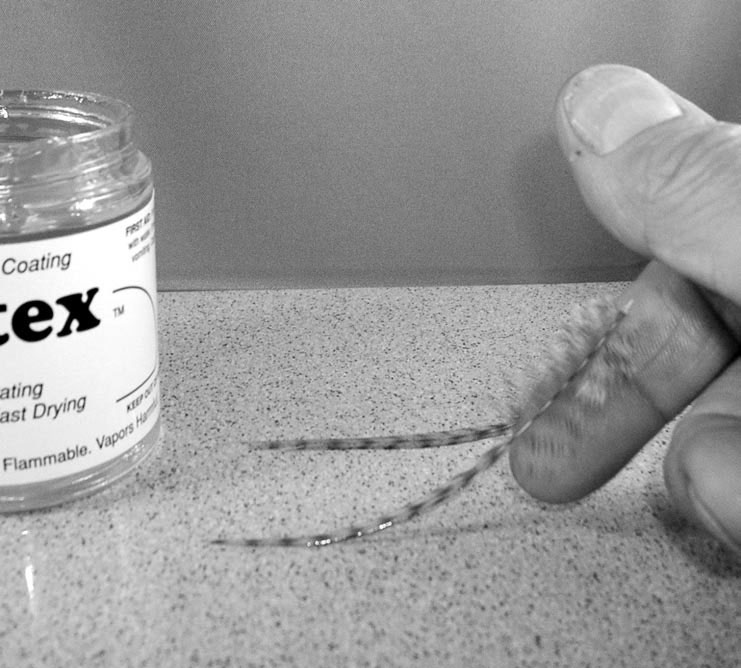
While holding the thick end of the quill, touch the wet tip of the feather to the drying surface and allow the feather to lie down flat. If the barbs are uneven or you want a narrow skin, a bodkin can move the barbs into the correct position.
The feather will dry slowly as it lies on the drying surface, so treating several hackles before bedtime is a good idea. The next day, they can be peeled off the surface with a strong, steady upward pull or coaxed off using a razor blade as they are lifted up.
The result is a feather enveloped in a durable, thin plastic film, with a contour that naturally fits the body taper of a nymph and with coloration and markings that closely resemble those of aquatic insects.
Bill Carnazzo


")