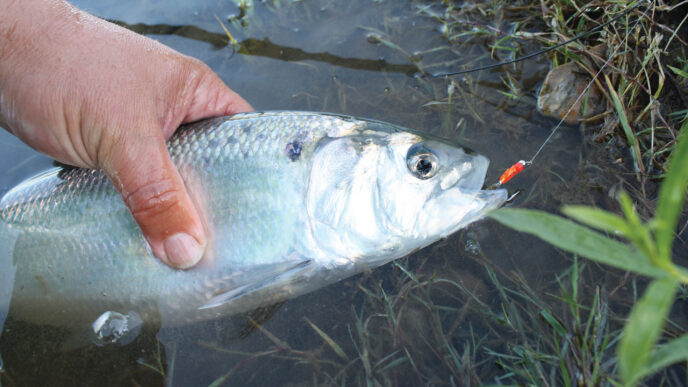

Editor’s note: Bill Carnazzo’s final column for this magazine features, appropriately, a pattern he designed specifically for the west-slope Sierra canyon streams that he loved to fish.
As I’ve Mentioned Before in this column, I am a firm believer in Dave Hughes’s pragmatic approach to adding fly patterns that I’ve designed to my fly boxes. The fly must earn a spot there by performing well over an extended time in the only classroom that counts. We’ve all experienced the anticlimactic letdown that occurs when the irresistible-looking fly that fell from the jaws of our vise performed like a world-beater at first, only to sputter and fail miserably, like (in the words of Elton John) a candle in the wind. I’ve had my share of that type of debacle, but in between those fizzles, the candle once in a while stays lit and maybe even flares up a bit — as in the case of the Little Greenie.
Take a break sometime when you are fishing a freshwater stream and turn over a few rocks, or better yet, grab a submerged branch or piece of wood and have a look at what lives in that part of the stream. You will undoubtedly find little dark-green worms that have black heads, and they will likely be the most populous insect on the rock or stick. Then, during mid-to-late afternoon, use a seine net to see if you can find out what’s in the drift. Again, you may find the same little green worms wriggling around on the screen. What are these little critters? They are caddis larvae whose taxonomic name is Rhyacophila. They and the Hydropshche are the two most populous types of caddisflies. Rhyacophila are “free-living,” meaning that they do not build a case, as other types of caddis do. They are predatory by nature and seek their food by wandering along the bottom. While the insect is normally a deep olive color (hence the common name “green rock worm”), their color may vary somewhat, even to a tannish color.
Why would Rhyacophila be found on the screen of the seine? The reason is that one of this bug’s characteristics is that the larvae engage in what entomologists call “behavioral drift,” which means that during the afternoon, these little guys launch themselves en masse into the flow of the stream. There seems to be general agreement among entomologists that this behavior is Mother Nature’s way of ensuring that the bugs are distributed throughout the entire stream.
Rhyacophila larvae generally live in riffle-type water, so when they engage in behavioral drift, caddis larva patterns will usually be productive. To imitate this behavior, make sure the fly drifts near the bottom of the water column. In other words, a Rhyacophila larva pattern is the perfect fly for short-line nymphing — or, if you are inclined to use bobbers, be sure that you are drifting your flies near the bottom. (I don’t recommend that technique, by the way.)
Rhyacophila typically hatch during summer afternoons, providing an excellent opportunity to use pupa patterns. Hatched adults then return to the water during the late afternoon and evening, and trout sometimes take them as the bugs alight on the surface. A very interesting fact regarding the adults’ behavior is that when they hit the water, they dive beneath the surface to deposit their eggs on the rocks at the bottom. They then swim back to the surface, break the surface film, and fly off. Good sources of information about this interesting behavioral characteristic and for some tactics for fishing during this activity are Trout Food, by Ralph Cutter (Stackpole Books, 2005); Caddisflies, by Gary LaFontaine (Lyons Press, 1981), and The Caddis and the Angler, by Larry Solomon and Eric Leiser (Stackpole Books, 1977).
This behavior can easily be mistaken for a hatch, so it pays to watch closely and make a decision as to whether what you are witnessing is a hatch or ovipositing activity. Unlike mayflies, Rhyacophila don’t deposit their eggs on the surface.
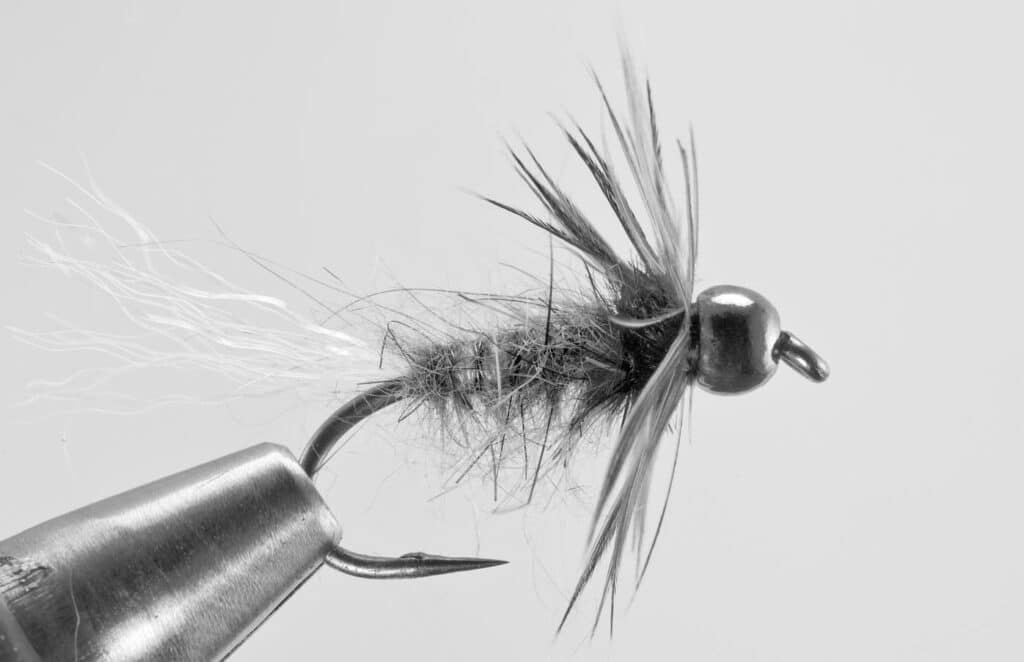
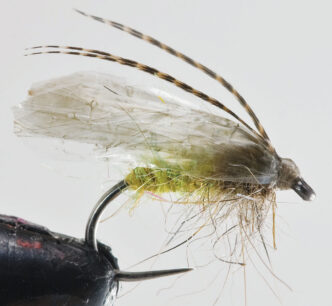
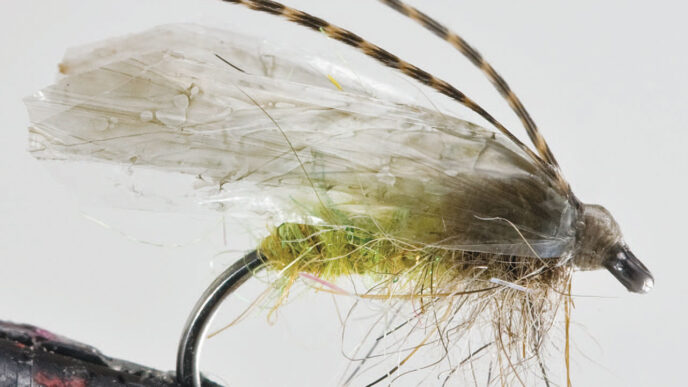
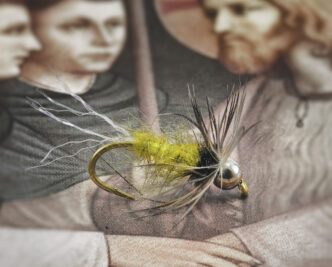
Does this suggest anything to you regarding fly patterns to imitate the diving and swimming behavior? Do soft-hackle flies come to mind? The Little Greenie is a soft-hackle Rhyacophila imitation. Although it has undergone a few changes over the years, the pattern remains basically the same as the day I first tied one.
The most important characteristic of this fly, at least in my opinion, is the manner in which the abdomen is constructed. In the materials list, you will note that fluorescent-green 70-denier tying thread is specified for the underbody. It is important that the thread color show through the dubbing—but not so much that it predominates. The method I use to accomplish this is to form the body with the fluorescent-green thread, then change the tying thread to black. To veil the fluorescent-green body, I then employ the touch dubbing technique that Gary LaFontaine (rest his soul) advocated in his books on tying caddis patterns. This technique creates translucency and an impression of life unlike what would result if the fly’s abdomen were just an ordinary opaque dubbed body. This technique, incidentally, is not new — it has been used for wet-fly patterns (traditional winged wets, wingless wets, flymphs, soft hackles, and nymphs) for a very long time.
I tie this fly on a variety of hooks, but as indicated in the materials list, an ordinary, standard-wire, 1X-long nymph hook such as the Umpqua U-101 will work fine. The other hooks I use are the Umpqua C-200, one of their “competition” series (supersharp and barbless) and the Daiichi 1260, because I like its curved shank and large gape. I sometimes also use scud hooks because . . . well, because I can. I also add a “tail” fashioned of just a few strands (and I do mean just a few strands) of UV pearl dubbing—not Flashabou. The tail is barely visible to the eye, but does catch light in the water. Because canyon walls and thick streamside vegetation tend to restrict available light in a canyon stream, the light-catching, reflective quality of the UV dubbing is important. Experience has demonstrated to me that adding this wisp of a tail seems to enhance the fly’s visibility to trout in that setting by gathering and reflecting available light. For the same reason, I add the UV dubbing tail to many of my soft-hackle patterns, despite the fact that doing so goes against the traditional tenets of soft-hackle fly construction. Because I’m never sure of anything, I suppose, I hedge my bets and keep a few tied in the “traditional” style in my fly box. Still, the ones with the UV tail are the first ones out of the box when I hit the river.
I’m convinced that using UV-reflective materials can be important in contemporary fly design. Trout see UV reflections from the insects on which they feed, and the scientists tell us that the degree of reflectance varies among insect species. (For an excellent exposition of this topic, see The New Scientific Angling: Trout and Ultraviolet Vision, by Reed Curry [Buckram Publishing, 2009]). Because of this, UV reflectance needs to be taken into account when tying flies. It may well be the case that use of UV-reflecting materials, albeit used in very sparse quantities, will increase your catch rate.
Interestingly, while the Little Greenie was originally conceived as a Rhyacophila imitation to be fished during behavioral drift, it can also be used during ovipositing and post-ovipositing activity. In this case, the UV tail seems to suggest the tiny stream of bubbles that entomologists say follows the insect on its path to the rocks to lay eggs and on its return journey to the water’s surface.
Why tie it soft-hackle style? The main reason is that I like the action of soft hackles, whether the fly is fished to imitate a larva engaged in behavioral drift or as an ovipositing or post-ovipositing adult. A properly tied soft-hackle fly exhibits lifelike movement during the drift by virtue of the waviness of the hackle as the current pushes and pulls its fibers. This movement, in turn, gives the fly life and seems to trigger the interest of the trout.
Materials
Hook: Any standard nymph hook, size 14 to 18 (See above for some variations.)
Thread: Black “Sheer” 14/0
Bead: Black, to suit hook size
Tail: Two or three wisps of UV pearl dubbing
Body base: Fluorescent green 70-denier flat nylon (very thin layer)
Body: Dark-olive spiky dubbing
Ribbing: Fine gold wire
Thorax: Fine black ostrich herl
Hackle: Starling
Tying Instructions
Step 1. Crimp the hook barb and mount the bead. Cover the hook shank with a single flat layer of the black thread. Stop immediately above the hook point and leave the bobbin there.
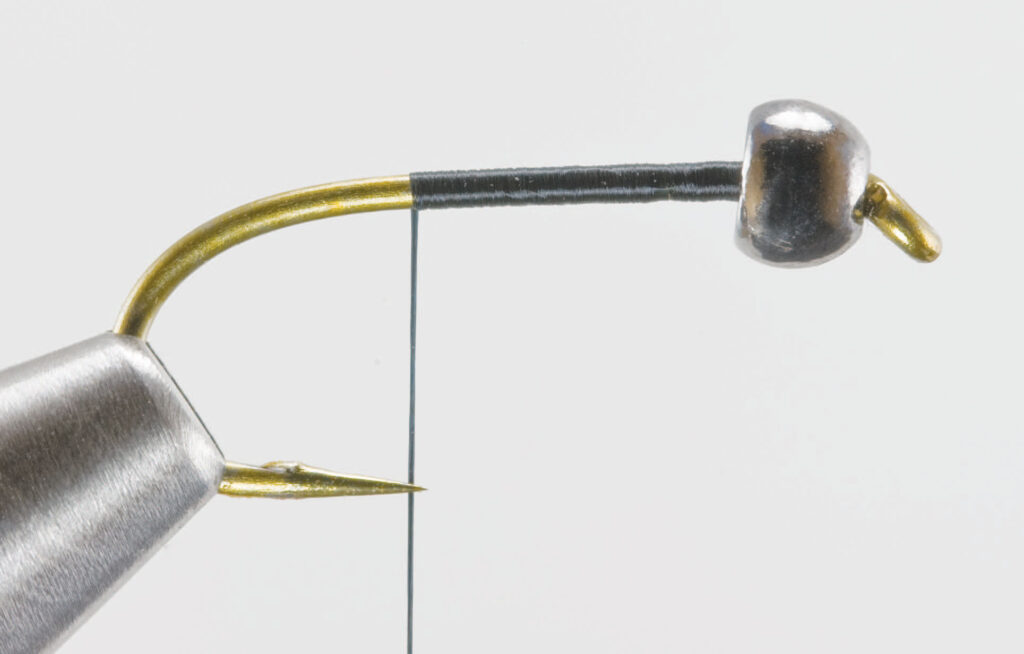
Step 2. Remove three or four wisps of UV pearl dubbing from the package. Roll them between your fingers and tie them in at that point.
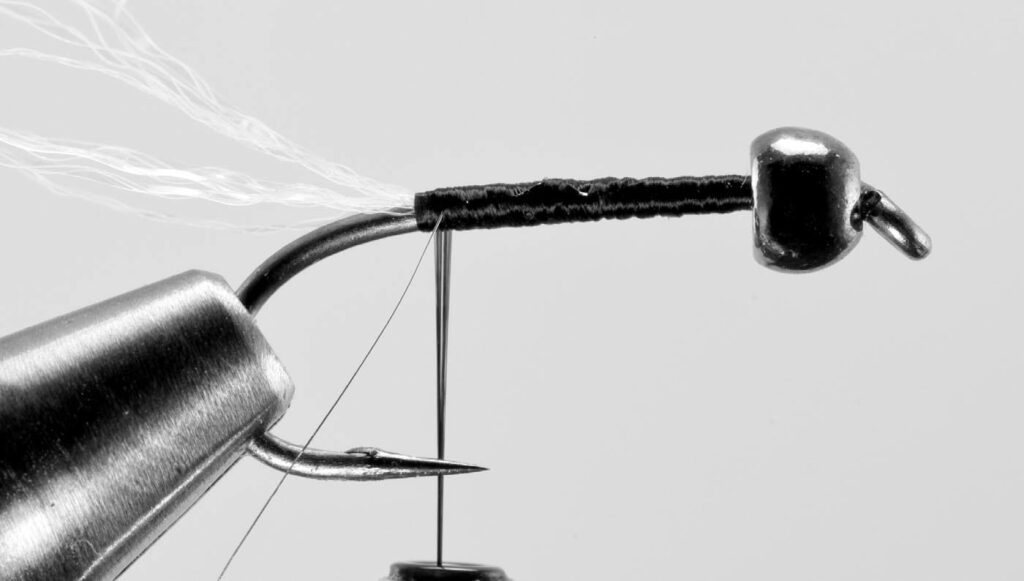
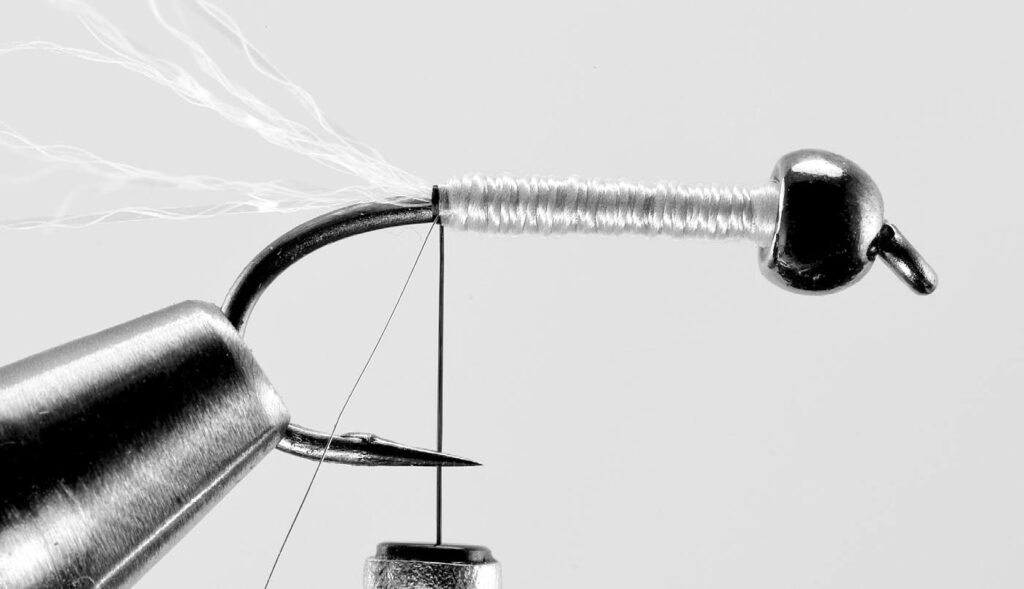
Step 3. Cut a short piece of fine gold wire and tie it in at the same point. For now, just let the bobbin with the black thread hang there. With another bobbin, start the green thread behind the bead and wrap it rearward in tight turns. Stop above the hook point, then wrap it forward to the back of the bead, laying down a smooth layer as you work forward. The body needs to be very thin. Whip finish the green thread there.
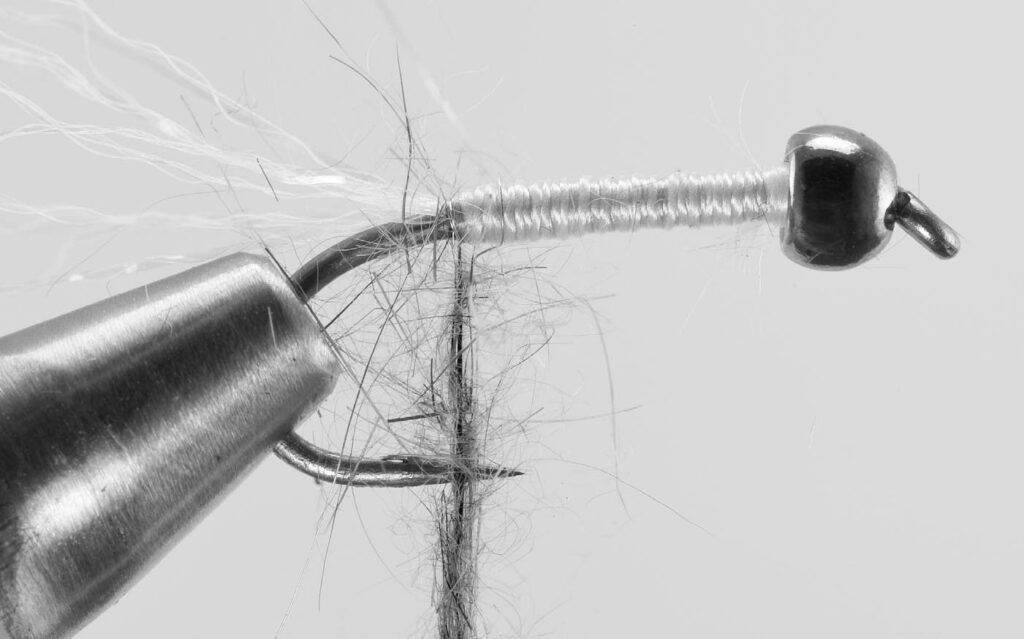
Step 4. Using tacky dubbing wax, wax a two-inch piece of the black thread; be sure to get the wax right up to the hook shank. Take a pinch of dark-olive dubbing between your thumb and forefinger and brush it along the length of the waxed thread, back and forth several times. This will result in some of the dubbing fibers sticking to the wax. Wind the thread forward using relatively tightly spaced turns, ending just behind the bead. Although the fluorescent green doesn’t show through much at this point, when it gets in the water, there will be a significant difference.
Step 5. Rib the fly with the gold wire, making five turns, and tie off the wire at the front of the body.
Step 6. Tie in three barbules of fine black ostrich herl by their tips with the butts facing forward. It is good to snip off a bit of the tips before tying in the barbules to obtain a stronger stem section. Wrap rearward over the herl tips to a point about three hook-eye lengths behind the bead. The butts should now be pointing rearward.
Step 7. Prepare an appropriately sized starling feather from the neck portion of the skin by first removing all of the whitish fluff from the bottom of the stem. Use your tweezers to grab the tip of the feather and moisten the thumb and forefinger of your other hand with water. (Don’t use saliva.) With the moistened fingers, gently stroke the feather’s barbules downward, toward the stem’s butt end. This step will isolate the tip, which can now be tied in. Tie the prepared feather concave side up, with the stem butt pointing forward. The feather should be tied in directly behind the bead.
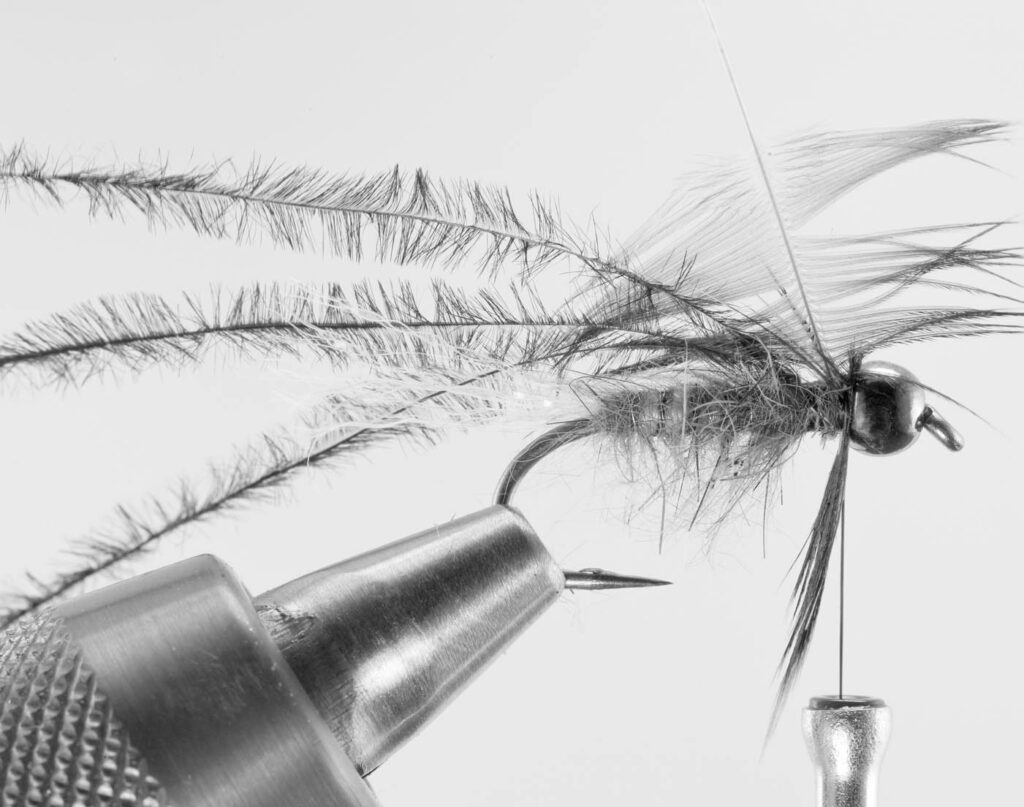
Step 8. Grab the three ostrich herls with your hackle pliers and twist them gently counterclockwise until they form a thin, uniform rope. Wrap the rope forward to the back of the bead, using about four turns, and tie it off there.
Step 9. Grab the stem of the starling feather with your hackle pliers and take two full wraps of the feather behind the bead, making sure that the concave side of the feather is facing rearward. Tie the feather off with a couple of tight turns behind the bead and clip the excess. Sweep the barbules rearward and whip finish behind the bead. Don’t be tempted to wrap over the barbules, because that will make them lie flat against the abdomen, which is not a desirable result because it inhibits their movement while the fly is drifting in the water column.