

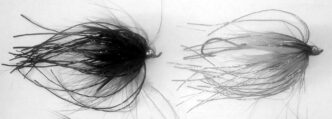
Ken Hanley is no stranger to these pages. He is a California Fly Fisher contributing editor and a former columnist — do you remember Ken’s “Tips ’n’ Tugs” series, featuring sage advice seasoned with fish stories? Ken has devoted his life to the outdoors as a mountain climber, backpacker, paddler of canoes and kayaks, and master fly angler. Ken has also produced three popular angling videos and is an ardent outdoor photographer. As an author, Ken has written magazine articles on all of the sports he’s enjoyed and has published seven books on freshwater and saltwater fly fishing, the latest being Tying Furled Flies: Patterns for Trout, Bass, and Steelhead (Headwater/Stackpole Books, 2008). This month’s fly, the Pygmy Hopper, is one of the furled designs featured there.
I first met Ken in 1990, when he presented a program to the Granite Bay Flycasters shortly after publication of his first book, California Fly Tying and Fishing Guide (Frank Amato Publications, 1989). Ken’s infectious enthusiasm and obvious passion for fly fishing — and his sense of humor — have been a source of inspiration to me and, I’m sure, to his audiences at fly-fishing shows and other venues.
Ken’s many and varied fly designs all have instructive stories behind them — well-researched, thoughtful vignettes that tell the “why” of the shape, profile, and materials used and connect those design criteria to some often less than obvious habit or characteristic of the insect, baitfish, or other life form that is the fly’s model. As an insightful and innovative fly designer, Ken has been muse and advisor for me. I’ve tied and used his flies effectively for bass, panfish, steelhead, trout, tarpon, and bonefish.
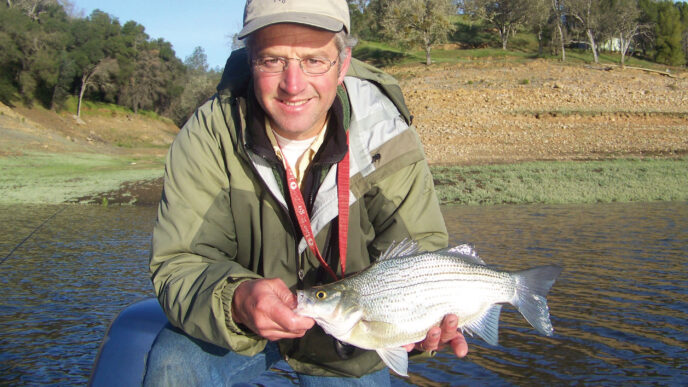
I’ve fished with Ken for smallmouth bass on the North Fork of the American River and at Sly Park Reservoir, for largemouth bass at Lakes El Salto and Mateos in Mexico, and for very large pike and lake trout at God’s Lake Lodge in Manitoba.
Along with our other angling friends, we laughed a lot, exchanged lore, got rained on and blown about by the wind, caught fish, enjoyed good food and drink, and (at least in my case) learned a lot about life. I asked Ken to describe his Pygmy Hopper, and here’s what he told me.
“My pattern isn’t just designed for the true pygmy grasshoppers. I also use this pattern to imitate immature versions of much larger grasshoppers. Most fly fishers offer large-profiled fly patterns imitating fully developed adult grasshoppers. I’ve taken a different approach by concentrating most of my presentations on the young hoppers — the nymphs and instars that are most abundant. Typically, these little guys go through a series of molts, as many as six times, on their way to becoming fully developed adults. They look strikingly like miniature versions of their larger kin.
“A common misconception is that hopper activity is limited to the terrestrial hatches of late summer and fall. Nothing could be further from reality, particularly for the pygmy family (Tetrigidae). I start fishing hopper patterns as early as late March in many years. As the days continue to warm, hopper presence builds. By May, huge populations of these little critters are quite active. You can certainly fish them with confidence from April through September. Come midsummer, all hoppers and hopperlike critters that fish see — the pygmy grasshoppers, the short-winged green grasshoppers (Dichromorpha viridis), the meadow grasshoppers (Chorthippus curtipennis Harris), and the coneheads and meadow katydids (Conocephalinae) — will kick into high gear. Everything gets into the fish-food mix, from tiny morsels to jumbo bruisers.
“This version of the Pygmy Hopper sports a great color scheme, and not just for the pygmy species. It works beautifully as an imitation of the other critters, as well. The meadow katydid clan, in particular, is composed of small to medium-sized insects with slender profiles. They’re at home in meadows near lakes and ponds. There is a really interesting aspect of their behavior, too: Once disturbed, they enter the water and anchor themselves to vegetation beneath the surface. They can remain submerged for several minutes. Because of that fact, I frequently will fish the Pygmy Hopper pattern “wet” a few inches under the surface.
“Black bass waters are a prime arena for the green hopper game. I enjoy working grass flats or overhanging brush. The largest largemouth I’ve caught on this fly was a four-pound beauty. That fish’s take was as subtle as a midge-sipping trout’s. Its slurp barely dimpled the water.
“My favorite trout environment in which to use this pattern is among meandering streams and mountain meadows. I relish the time walking along grass-bound banks with undercuts and clear waters. Three techniques work well for me. The first is a downstream presentation that literally comes off the grass bank opposite where I’m standing. I make my cast across the stream so that the fly lands on the grass. I then point the fly rod directly at the hopper and slowly tighten my line until the fly “jumps” into the water. A few twitches often seal the deal with a rainbow or brown that’s been lurking in the undercut. The second presentation is simply casting across and downstream while driving the fly fairly hard to the surface. The abrupt landing acts as a calling card. I use the third technique when I’m working the bank at my feet. I stand approximately 10 to 15 feet back and keep a low profile. I basically put only the leader and tippet in play. My goal is to make short drifts tight to the bank. This is much like a short-line nymphing presentation, only I’m showing the fish a floating or semidrowned struggling grasshopper.”
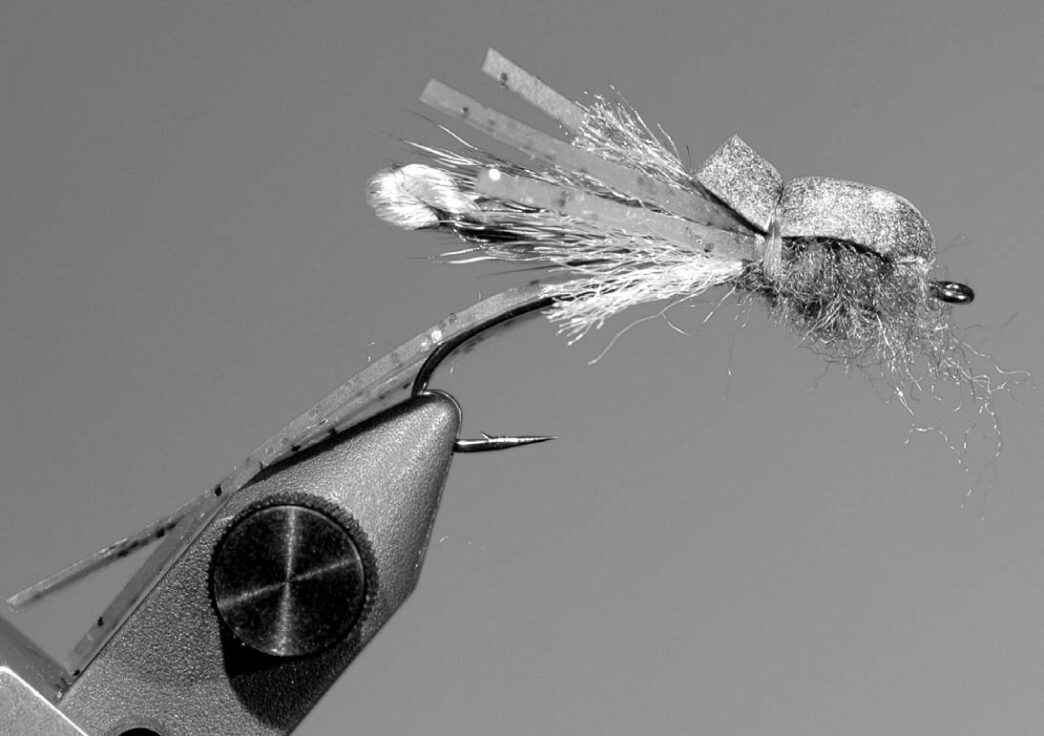
Materials
Hook: Straight eye, 3X long, curved shank, size 6 to 8 (e.g., Daiichi 1270, Tiemco 200RBL)
Thread: Olive 8/0 or 6/0
Tag: Red Stretch Floss or silk
Abdomen: Dark olive + olive + caddis green Antron fibers, furled
Underwing: Natural-colored deer hair, then the open end of the furled Antron (Alternative wing: Turkey tail feather or quill, coated with a flexible material such as Softex)
Long kicker legs: Pumpkin/blue-black flake Silicone Legs
Front legs: Pumpkin/blue-black flake Silicone Legs
Head float: Green 3mm Fly Foam strip, a quarter of an inch in width and about two inches long, tapered to a point at one end (Alternative head float: White foam, colored with a sage-colored permanent marker)
Thorax: Sage-green dubbing
Tying Instructions
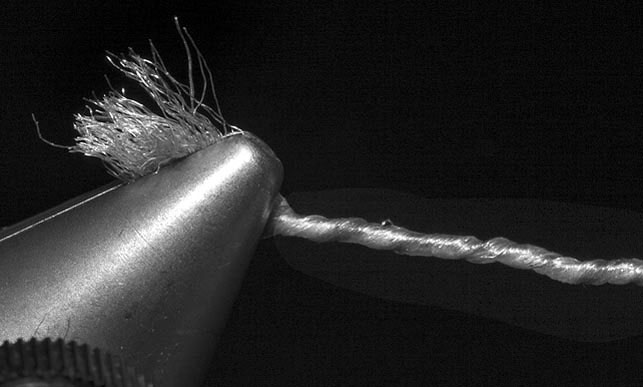
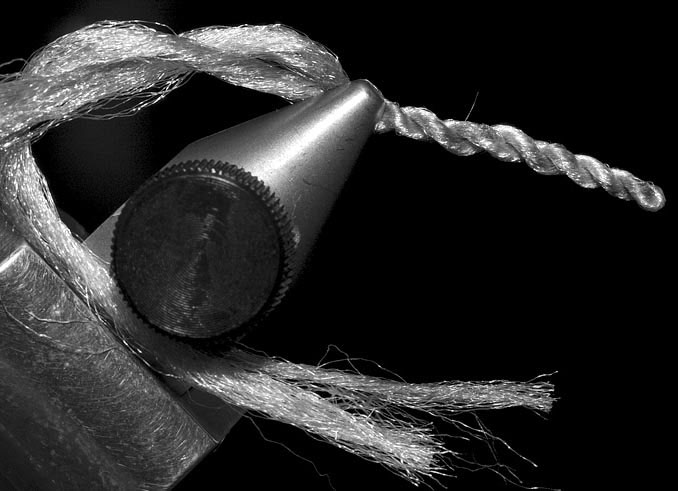
Step 1. Cut three six-inch pieces of Antron — one each of the three colors mentioned above. Clamp one end in the vise, using it as an anchor point to help you create the furled extended abdomen: Twist the strands of Antron clockwise into a string. Fold the string over itself and twist counterclockwise into a single furled piece of Antron. Set this piece aside for now. See the sidebar for detailed instructions on the furling process.
Step 2. Wrap a red tag of Stretch Floss or silk on the back half of the hook shank. Measure the furled abdomen to extend slightly beyond the hook’s bend. Tie in the furled Antron piece at the midpoint of the shank. The open end of the Antron now extends past the hook eye. Tie in the two kicker legs at the same midshank position.
Step 3. Add an underwing of deer hair over the furled Antron at the midshank position. Take the remaining Antron that was extending forward over the hook eye and fold it back over the deer hair to create an overwing. Cut the Antron overwing slightly shorter than the deer hair. (Alternatively, you can tie in a more conventional wing made of turkey tail feather.)
Step 4. Add two short legs on each side of the Antron overwing. Move the thread forward toward the hook eye and secure the tapered end of a two-inch strip of foam. The foam should extend forward over the hook eye.
Step 5. With the thread behind the hook eye, create a dubbing loop to wrap the thorax. Wrap the dubbing back to the midshank position. Fold the foam strip back over the dubbing. Tie off the foam cap near the midshank position and trim the extended foam just beyond the tying thread. Don’t cut it too short! If you used white foam, apply color with a Prismacolor pen to finish the fly.
Go crank out a few of Ken’s juicy morsels. Also, visit his website at www.pacificextremes.com.
A Tutorial on Making Furled Bodies
For a full discussion of the furling process, including excellent images of each step of the process, see Ken’s Tying Furled Flies: Patterns for Trout, Bass, and Steelhead, chapter 1, pages 1 through 11. While several furling methods are detailed there, we’ll use the vise-as-anchor approach for tying the Pygmy Hopper.
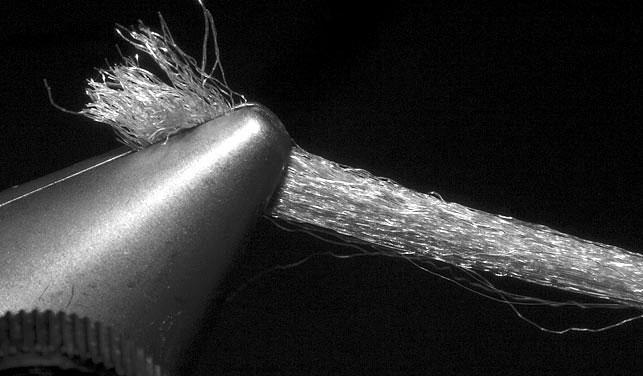
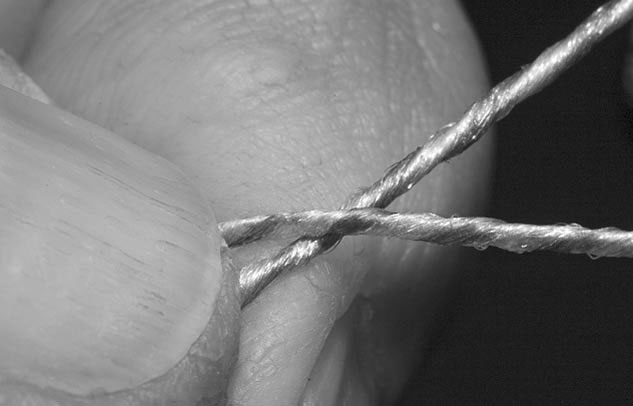
Step 1. After cutting the three pieces of Antron (see Step 1 in the tying sequence), lock one end of the group into the jaws of your vise, with the remainder pointing toward the floor.
Step. 2. If you are right-handed, grasp the yarn with your left thumb and forefinger just below the vise jaws and twist the material from left to right, moving downward as you do so, maintaining constant downward pressure.
Upon completion of your first twist, slide the thumb and forefinger of your right hand down the twisted yarn and twist the yarn again in the same direction. Repeat the process until you’re near the end of the yarn strands. You’ll notice a “barber pole” effect: The tighter your strands are twisted, the smaller the yarn diameter will become, and the more pronounced the segmentation will appear.
Step 3. While maintaining downward pressure on the yarn with your right hand, grasp the center of the twisted yarn in your left hand and move your right hand with the end of the yarn up to the head of your vise. Your left hand should maintain downward pressure, and your right hand should maintain upward pressure. This keeps the entire strand under constant pressure. Failing that, one side or the other will relax, and the final step will not work well.
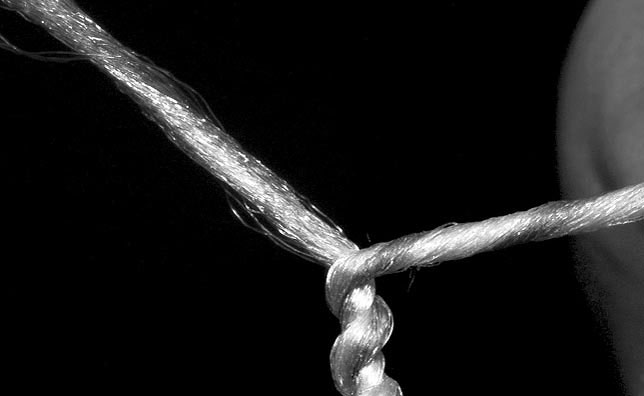
Step 4. Using your left thumb and forefinger, twist both segments together, moving your thumb from right to left this time. That has the effect of “welding” the two segments together and closing the very tip of the now-furled yarn. This results in a multicolored tapered body.
Bill Carnazzo


")