

I’ve often heard the lament from fly-shop owners and others in our industry that our sport is not attracting many young men and women, the way it did in the heyday following “The Movie.” We are becoming a geezer-dominated demographic, or so the claim goes — admittedly talented, but running out of steam. Leaving aside the question of the veracity of that assertion, it is always a pleasure to meet gifted, enthusiastic young fly anglers, whether they are intrepid guides, “shop dogs,” industry reps, creative fly tyers, or just darn good fly fishers.
I first heard Zack Thurman’s name about a year ago while fishing the lower Sacramento River with my friend Chris Parsons, who guides for The Fly Shop in Redding. I was looking through Chris’s fly boxes when I spotted a particularly buggy looking small nymph. Admiring its elegant simplicity and form, I promptly knotted it to my tippet. After a few hefty ’bows had eaten the nymph, Chris told me that Zack had designed the fly and had given him a few to try out. Well, as far as I was concerned, the piscatorial jury had convicted the fly of misconduct in the first degree.
Zack grew up within walking distance of the Sacramento River. He started fly fishing and tying flies at a young age. His creativity and hard work landed him a job at a local fly shop, and he began tying flies commercially in high school. Zack now works for The Fly Shop. When he’s not cranking out his next creation at the vise, you will find him chasing large trout at stillwater venues or on spring creeks in Southern Oregon, Nevada, and Northern California in the spring and summer. In the fall and winter, he chases that fish of a thousand casts, the wily winter steelhead. Zack is a contract tyer for the Montana Fly company, where all of his many fly patterns are produced and marketed. His flies have been featured in several major fly-fishing publications, as well as on two DVDs, Suggestive Stillwater Flies and Next Generation Nymphs (both by Bennett-Watt Entertainment). Zack lists Mike Mercer, Tim Fox, and Jay Fair as his mentors. With that kind of talent in his corner, we can expect great things from this young fly designer in the future. For my part, I’ve added Zack to my list of tyers for the How-To Center at the Sacramento International Sportsmen’s Exposition in 2011 so everyone can have the opportunity to meet him and watch him in action.
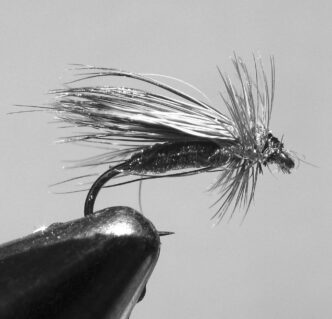
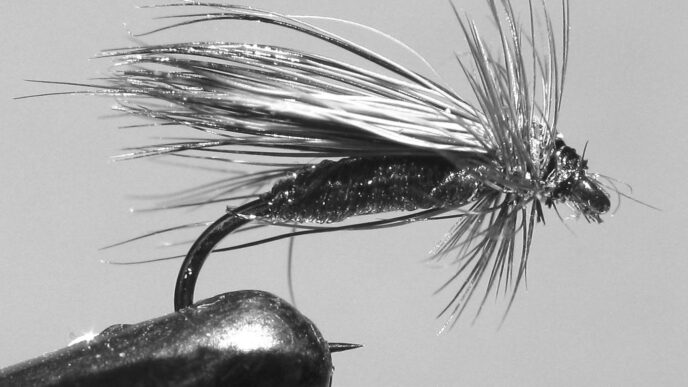
Here’s Zack telling the story behind the Damseleech and describing his creative use of materials and the tying steps. While Zack is not the first tyer to use aftershaft feathers for gills (see, for example, Andy Burk’s Hexagenia Nymph), his overall design is unique and interesting. As you read Zack’s narrative, you might ask yourself this question: Where do my own ideas for fly design come from? Perhaps think about a fly you have created or modified that has worked the magic we all hope will happen. You may surprise yourself. Personally, I find that question fascinating food for thought.
“The main idea behind the Damseleech was to extend my selection of stillwater patterns by creating a counterpart to another of my fly patterns, the Zack-Attack Damsel, a highly successful bug. While many of my patterns were conceived on the water, the idea for the Damseleech came to me at the vise in my continuous quest to improve my flies or come up with something original. My design idea was to combine the elements of the Zack-Attack with those of a Callibaetis pattern that I named the Zallibaetis Callibaetis — in other words, to come up with a cross between a damselfly nymph and a Callibaetis nymph.
“The common element featured in all of my stillwater patterns is what I call ‘suggestive movement.’ Movement is essential in stillwater flies — the pattern has to look natural and ‘breathe’ in the water. In order to achieve that goal, the pattern must have as many moving parts as possible. Employing the long, sparse tail from the ZackAttack and the aftershaft body of the Zallibaetis to create the Damseleech quite possibly has produced the most suggestive and deadly fly I have designed yet.
“Now for the best part: When I retrieve the Damseleech, whether with a pull-and-pause retrieve or a hand twist, the tail and body pulsate enticingly in the water. I have tested this fly on my home waters in both Northern California and Southern Oregon. In my first experiment with it, in the early spring, it worked quite well both casting to cruising fish and blind fishing, even though there were very few insects hatching in the cold weather. Still, the fish could not resist it. During my stillwater forays last fall, the Damseleech fooled some very big, wary trout. Most recently, a 15-pound rainbow fell victim to the Damseleech on one of my favorite Southern Oregon lakes.
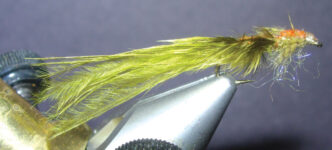
“As you might surmise from the name of the fly, the Damseleech can be deadly during a damselfly hatch, but the second part of the name (dreamed up with the help of Mike Mercer) relates to its leechlike appearance in the water. If I am fishing the fly as a leech pattern, I use hook sizes 8 and 10; if my target bug is a damselfly nymph, I use sizes 12 and 14. The potential color combinations are numerous, ranging from olive, burnt orange, and rust (or any combination thereof ) for damsels to black and browns for leeches. My personal favorite color combination is an olive body with a burnt-orange back. I have also experimented with a partridge soft-hackle collar to mimic an emerging damselfly and have done well. Though it is designed primarily for lakes, I have fished the Damseleech effectively on a few spring creeks.
“The best all-around line for fishing the Damseleech is a clear or camouflage tinted intermediate, since I generally fish this fly in water no deeper than six feet. In fact, most of the time, I fish it in the top three feet of the water column, where a significant portion of feeding occurs in lakes. In my view, the best retrieves are a four-to-six-inch pull and pause or a slow hand twist. While each day can be different, when I am on fish, I switch between the two. Interestingly, on any given lake, on some days, the pull-and-pause retrieve works best, and on others, the slow hand twist gets the nod.
“I have been very fortunate to have Jay and Glenn Fair as my mentors and brainstorming partners. I bounce ideas off them constantly and seem to learn something from every conversation. As well, Mike Mercer and Tim Fox have been invaluable resources for sage advice on creating, naming, and marketing my flies.”
Materials
Editor’s note: the materials list and tying instructions are in Zack’s words.
Hook: For the damsel configuration, I use standard 1XL nymph hooks such as the TMC 3761 in sizes 12 and 14; for leeches, I use standard 2XL streamer hooks such as the TMC 5263 in sizes 8 to 10. There are other brands that will perform equally well.
Thread: 6/0 or 8/0 in dark olive, olive, brown, dark brown, or black, depending on the color choices for the fly.
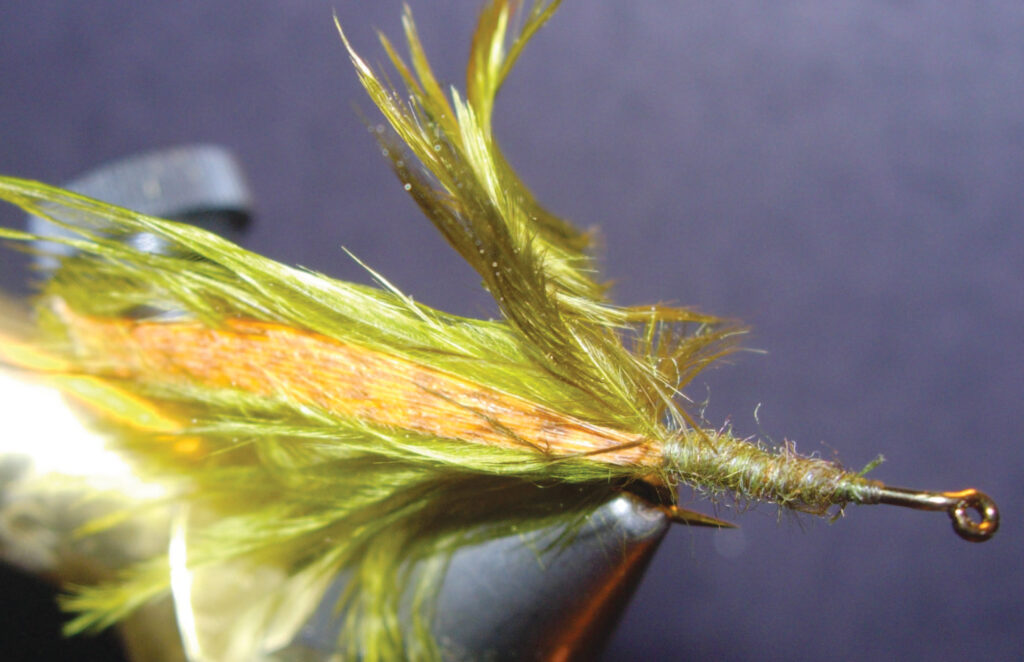
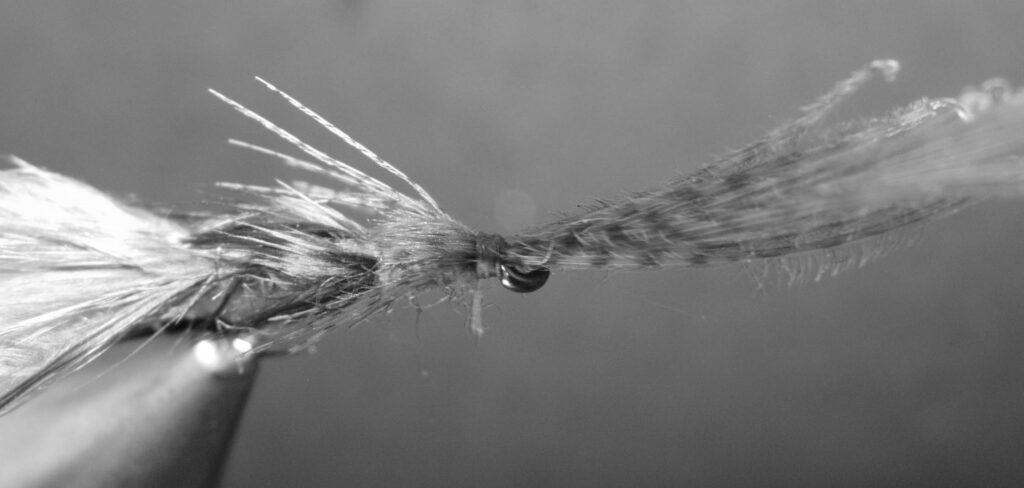
Tail: The tail is tied with long, soft marabou plumes in order to provide maximum movement. The tail should be at least as long as the hook shank and somewhat sparse. Though overdressed tails seem to sell better in the fly bins, a long, sparse tail is far more effective. I have personally tested flies with sparse tails against those with bulky tails — the difference in movement is dramatic. Tails can be tied with multiple colors, such as olive and burnt orange. Sometimes adding that slight variation can make a huge difference, especially in heavily fished waters.
Rib: The rib, which is used to segment the abdomen, is small wire, copper or copper-brown in color. This gives the fly a slight shine, but more importantly, it makes the fly more durable. I tie the wire in after the tail, but don’t wrap it forward until after the gills, back and wing case, and dubbed body are complete.
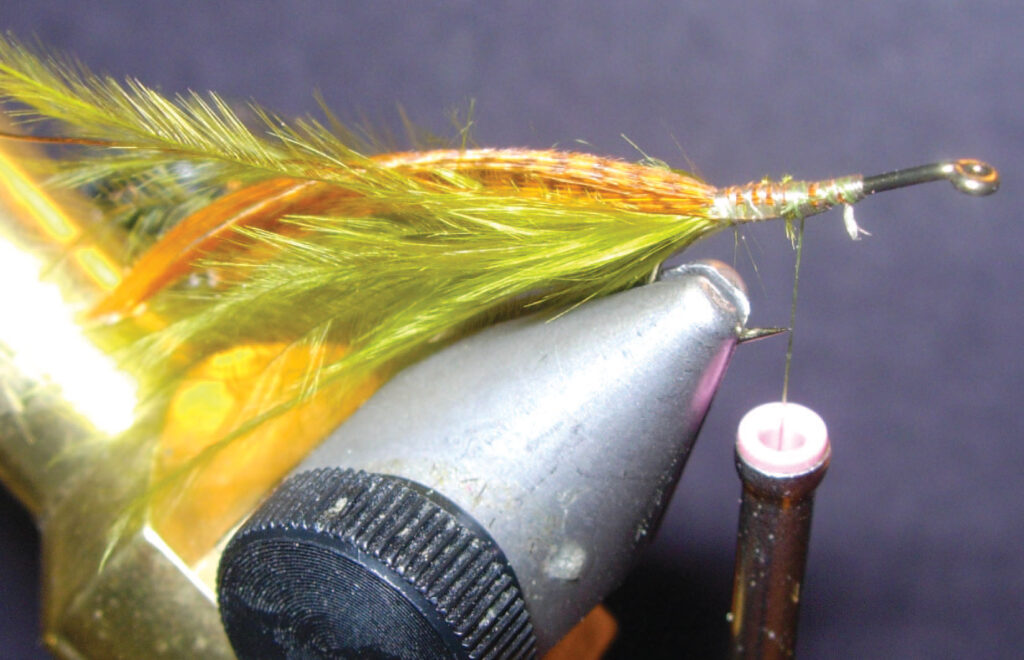
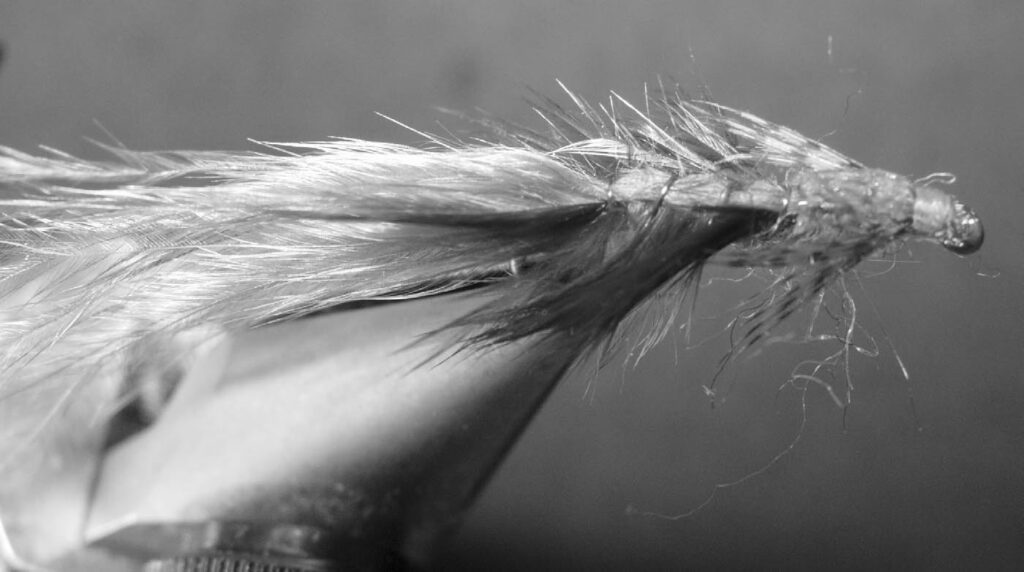
Wing Case/Back: The covering of the abdomen and thorax is made from dyed mallard flank feathers, normally in olive or burnt orange. I use different pieces for the abdomen and for the thorax, because the wing case over the thorax is usually wider.
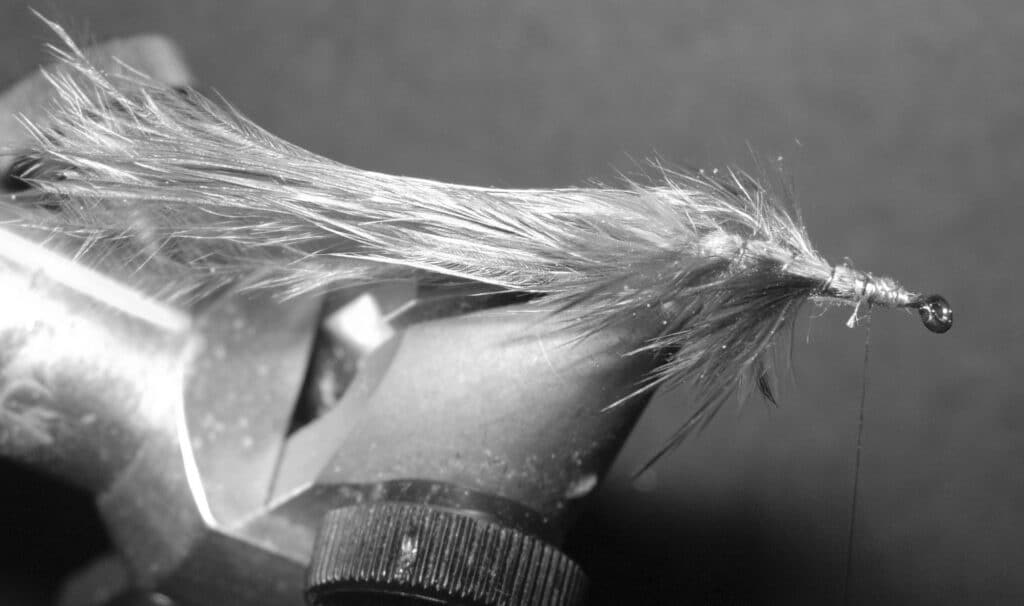
Gills: I use aftershafts, located between individual pheasant rump feathers, in olive, burnt orange, and rust. Aftershaft gills, like marabou tails, impart movement to the fly. Color choice is dictated by the color of the damselflies in the lake I intend to fish. I tie the aftershaft feather in by its tip after the mallard, but don’t pull it over the back until I have dubbed the hook shank sparsely. Care must be taken tying in the aftershaft feather, because its stem is very fragile.
Dubbing: For both the abdomen and the thorax, I use a mix of 70 percent Buggy Nymph Dubbing in “Brownish Olive” and 30 percent UV “Light Olive” Ice Dubbing. Because damselflies are not bulky insects, the body should be dubbed sparsely. Legs: Approximately six dyed mallard flank feather fibers, either olive or burnt orange, tied on each side at the front of the thorax. The legs should extend to the rear of the thorax.
Head Cement: Any hard, shiny-finish head cement will work. Loon Hard Head is one example; some tyers simply use Sally Hansen’s Hard as Nails. Other products will work, as well. I cover the wing case over the thorax and the head of the fly to provide sheen and durability.
Tying Instructions
Step 1: Start the thread at the midpoint of the hook shank and wrap rearward to a point directly above the back of the barb.
Step 2: Tie in the marabou tail at that point, keeping it long and sparse, then tie in the ribbing wire at the same point.
Step 3: Tie in the tips of the dyed mallard (for the back of the abdomen) at the same point, with the shiny side down. For now, the mallard feather should remain in this position, with the stem pointing to the rear.
Step 4: Tie in an aftershaft feather by its tip and leave it there, just as you did with the mallard.
Step 5: Dub the abdomen area sparsely, leaving the thread at the front of the abdomen.
Step 6: Pull the aftershaft feather over the dubbing and tie it down at the front of the abdomen.
Step 7: Pull the mallard over the aftershaft feather and the dubbing and tie it down at the front end of the abdomen.
Step 8: Wrap the ribbing wire forward in wide turns to give the abdomen a segmented look. Tie it down at the front of the abdomen. As you wrap the wire forward, carefully weave it in between the aftershaft barbs, which will represent the insect’s gills and provide movement. If you tie down some of the barbs, gently pick them out with your bodkin. The longer aftershaft barbs can be “trimmed,” if you desire, by using your thumbnail and forefinger to sculpt them gently.
Step 9: At the front of the abdomen, tie in a dyed mallard feather for the thorax wing case in the same manner as the mallard for the abdomen. Pull it forward to see whether you’ve left a gap between the front of the abdomen and the base of the feather, and if you have, wrap rearward until the gap is eliminated. Leave the feather in that position for now.
Step 10: Dub the thorax area sparsely, leaving the thread at the front of the thorax. Be sure to leave at least one hook eye’s width of open space behind the eye so that you can form a tapered head.
Step 11: Tie in the mallard legs at the front of and on each side of the thorax. Use five or six barbules on each side, measuring their length to the back of the thorax.
Step 12: Pull the mallard feather wing case forward over the dubbed thorax. As you do so, pull it tightly over the dubbing and center it between the two sets of legs. Tie it down at the front of the thorax.
Step 13: Form a tapered head and whip finish.
Step 14: Coat the wing case as well as the head with a hard-finish, shiny head cement. Be sure not to get head cement on the marabou tail or the aftershaft gills, because this will destroy the moving parts of the fly.
Is It a “Filoplume” or an “Aftershaft?”
Fly tyers use body feathers from many different birds. One prominent example is the common pheasant. (See the late Jack Gartside’s excellent article on this subject, which you can find at http://www.blueribbonflies.com/howto/flytying_pheasantskin.shtml). Often, beneath the body feathers, there will be a feather known as an “aftershaft.” Delicate, soft, and grayish in hue, they are generally three-quarters of an inch up to an inch and a half in length.
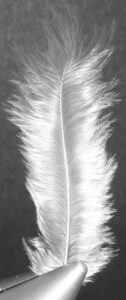
Aftershafts are different from “filoplumes,” although the two terms are sometimes mistakenly used interchangeably by fly tyers. Filoplumes are simple, hairlike structures that grow in circles around the base of body feathers. They usually stand up like hairs and are made up of a thin stem with a few short barbules at the tip.
Unlike filoplumes, aftershafts have many uses for fly tyers. Zack’s fly employs an aftershaft for the gill structures on a damselfly nymph, but they are also used for soft-hackle flies, wing cases on nymphs, for soft, wavy bodies, and for collars.
Bill Carnazzo


")